Configure Swift with Nexus
Note
Swift does not support chained proxy repositories and content replication.
Configure your SPM registry to connect to and authenticate to a Nexus Swift Repository. Swift Package Manager (SPM) uses a registries.json file to define registry endpoints. Note that you must create a Swift repository in Nexus before configuring your Swift client to connect to it. Refer to Create a Swift Repository for more details.
SPM can be configured through two methods:
Configuration Method | Platforms | Best For |
|---|---|---|
Registry Login |
| HTTPS Only |
Embedded Credentials |
| HTTPS and HTTP |
Registry Login
Use the Registry Login configuration method when your SPM client is on MacOS/Linux and only HTTPS support is required.
From your Swift project directory, run the following command to add the Nexus repository to your Swift registry configuration:
swift package-registry set "https://[NexusURL]/repository/<REPO_NAME>/"
Note
To configure the registry globally for all Swift projects, use the following command:
swift package-registry set --global "https://[NexusURL]/repository/<REPO_NAME>/"
Where,
[NexusURL]- The URL of your Nexus instance<REPO_NAME>- The name of the target repository in Nexus
For example:
swift package-registry set "https://example.nexus.com/repository/swift-proxy/"
This will create the
.swiftpm/configuration/registries.jsonfile.An example with
--globalflag:swift package-registry set --global "https://example.nexus.com/repository/swift-proxy/"
This will create the
~/Library/org.swift.swiftpm/configuration/registries.jsonfile.Authentication: Login to your Nexus instance with SPM.
swift package-registry login https://[NexusURL]/repository/<REPO_NAME>/login \
 --username=<USER_TOKEN_NAME_CODE> \
 --password=<USER_TOKEN_PASS_CODE>
Note
If you have Nexus Anonymous Access turned ON, you can skip this login step.
Where,
[NexusURL]- The URL of your Nexus instance<REPO_NAME>- The name of the target repository in Nexus<USER_TOKEN_NAME_CODE>- Your Nexus username or the Nexus Pro only User Token Name Code<USER_TOKEN_PASS_CODE>- Your Nexus password or the Nexus Pro only User Token Pass Code
Tip
Sonatype recommends using User Token Name Code and User Token Pass Code instead of username and password. To access your Token Names:
Go to Account → User Token → Access User Token → Authenticate
Copy the User Token Name Code
Copy the User Token Pass Code
Example:
swift package-registry login https://example.nexus.com/repository/swift-hosted/login \
 --username="abcdefg" \
 --password='-dXXXXXXXXXXXXXX'
Note
If your password contains "
-d", use query parameters for the login request to avoid it being parsed incorrectly.
Embedded Credentials
Use the Embedded Credentials configuration method when your SPM client is on MacOS/Linux/Windows and requires support of HTTP or HTTPS.
Create the
configurationdirectory andregistries.jsonfile.mkdir -p ~/Library/org.swift.swiftpm/configuration \ && touch ~/Library/org.swift.swiftpm/configuration/registries.json
Insert registry and authentication content in
registries.jsonfile.cat > ~/Library/org.swift.swiftpm/configuration/registries.json <<'EOF' { "registries": { "[default]": { "url": "https://<USER_TOKEN_NAME_CODE>:<USER_TOKEN_PASS_CODE>@[NexusURL]/repository/<REPO_NAME>/" } }, "version": 1 } EOFWhere,
<USER_TOKEN_NAME_CODE>- Your Nexus username or the Nexus Pro only User Token Name Code.<USER_TOKEN_PASS_CODE>- Your Nexus password or the Nexus Pro only User Token Pass Code[NexusURL]- The URL of your Nexus instance<REPO_NAME>- The name of the target repository in Nexus
Tip
Sonatype recommends using User Token Name Code and User Token Pass Code instead of username and password. To access your Token Names:
Go to Account → User Token → Access User Token → Authenticate
Copy the User Token Name Code
Copy the User Token Pass Code
Example:
cat > ~/Library/org.swift.swiftpm/configuration/registries.json <<'EOF'
{
  "registries": {
    "[default]": {
      "url": "https://admin:[email protected]/repository/swift-hosted/"
    }
  },
  "version": 1
}
EOF
For Xcode configuration, see Use Nexus with Xcode
Create the
configurationdirectory andregistries.jsonfile.mkdir -p ~/.swiftpm/configuration \ && touch ~/.swiftpm/configuration/registries.json
Insert registry and authentication content in
registries.jsonfile.cat > ~/.swiftpm/configuration/registries.json <<'EOF' { "registries": { "[default]": { "url": "https://<USER_TOKEN_NAME_CODE>:<USER_TOKEN_PASS_CODE>@[NexusURL]/repository/<REPO_NAME>/" }, "version": 1 } EOFWhere
<USER_TOKEN_NAME_CODE>- Your Nexus username or the Nexus Pro only User Token Name Code.<USER_TOKEN_PASS_CODE>- Your Nexus password or the Nexus Pro only User Token Pass Code[NexusURL]- The URL of your Nexus instance<REPO_NAME>- The name of the target repository in Nexus
Tip
Sonatype recommends using User Token Name Code and User Token Pass Code instead of username and password. To access your Token Names:
Go to Account → User Token → Access User Token → Authenticate
Copy the User Token Name Code
Copy the User Token Pass Code
Example:
cat > ~/.swiftpm/configuration/registries.json <<'EOF'
{
  "registries": {
    "[default]": {
      "url": "https://admin:[email protected]/repository/swift-hosted/"
  },
  "version": 1
}
EOF
Create the
configurationdirectory andregistries.jsonfile.New-Item -ItemType Directory -Force -Path "$env:USERPROFILE\.swiftpm\configuration" | Out-Null New-Item -ItemType File -Force -Path "$env:USERPROFILE\.swiftpm\configuration\registries.json"
Insert registry and authentication content in
registries.jsonfile. Note that while using anonymous access, it is not required to use usertoken namecode and passcode.@' { "registries": { "[default]": { "url": "https://<USER_TOKEN_NAME_CODE>:<USER_TOKEN_PASS_CODE>@[NexusURL]/repository/<REPO_NAME>/" } }, "version": 1 } '@ | Set-Content -Encoding UTF8 "$env:USERPROFILE\.swiftpm\configuration\registries.json"Where,
<USER_TOKEN_NAME_CODE>- Your Nexus username or the Nexus Pro only User Token Name Code.<USER_TOKEN_PASS_CODE>- Your Nexus password or the Nexus Pro only User Token Pass Code[NexusURL]- The URL of your Nexus instance<REPO_NAME>- The name of the target repository in Nexus
Tip
Sonatype recommends using User Token Name Code and User Token Pass Code instead of username and password. To access your Token Names:
Go to Account → User Token → Access User Token → Authenticate
Copy the User Token Name Code
Copy the User Token Pass Code
Example:
@'
{
  "registries": {
    "[default]": {
      "url": "https://admin:[email protected]/repository/swift-hosted/"
    }
  },
  "version": 1
}
'@ | Set-Content -Encoding UTF8 "$env:USERPROFILE\.swiftpm\configuration\registries.json"
Use Nexus with Xcode
Xcode is Apple’s integrated development environment for building applications on Apple platforms. Developers use Xcode to create projects, add dependencies, build, run, and test applications. See Xcode - Apple Developer
Use this section to configure Xcode to fetch Swift packages from a Nexus Swift registry.
Prerequisites
Before you add packages in Xcode, make sure you have:
Nexus repository URL
Username and password or user token for the repository
Access to the Xcode project where you want to add the package
Configure Credentials
To let Xcode authenticate to the Nexus Swift registry, add your repository credentials to the ~/.netrc file.
Open the
~/.netrcfile.~/.netrc
Add an entry for the Nexus host.
machine <host>
  login <username>
  password <password>
Save the file.
Set the required file permissions.
chmod 600 ~/.netrc
Configure Swift Package Registry for Xcode
To let Xcode locate the Nexus Swift registry, add the registry configuration to the registries.json file.
Open the
registries.jsonfile.~/Library/org.swift.swiftpm/configuration/registries.json
If the configuration directory does not exist, create it.
mkdir -p ~/Library/org.swift.swiftpm/configuration/
Add the registry configuration.
{
  "authentication": {
    "<host>": {
      "loginAPIPath": "/repository/<repository-name>/login",
      "type": "basic"
    }
  },
  "registries": {
    "[default]": {
      "supportsAvailability": false,
      "url": "https://<host>/repository/<repository-name>/"
    }
  },
  "version": 1
}
Where,
<host>: Your Nexus URL, for exampleexample.nexus.com<repository-name>: Your Nexus repository name, for example swift-group
Add a Package Dependency in Xcode
To add a package from the Nexus Swift registry to an Xcode project, use the Add Package Dependencies command in Xcode.
Open Xcode. Create a project, or open an existing project.
From the File menu, select Add Package Dependencies.
In the search field, enter the package identifier in
SCOPE.PACKAGENAMEformat.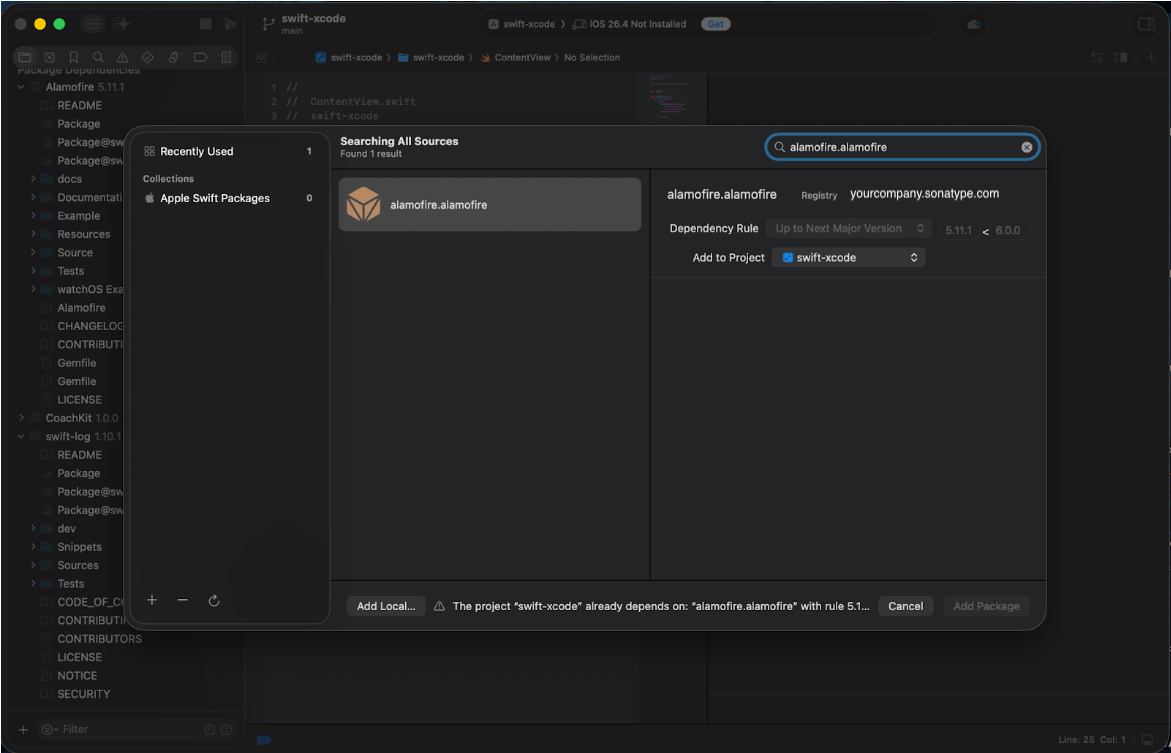
Select the package version and target.
Select Add Package.
Example package identifiers:
apple.swift-log
apple.swift-algorithms
If your project uses a Package.swift manifest, declare dependencies with registry identifiers:
// swift-tools-version:5.9
import PackageDescription

let package = Package(
    name: "MyApp",
    dependencies: [
        .package(id: "apple.swift-log", from: "1.0.0"),
        .package(id: "apple.swift-algorithms", from: "1.0.0"),
    ],
    targets: [
        .target(
            name: "MyApp",
            dependencies: [
                .product(name: "Logging", package: "apple.swift-log"),
                .product(name: "Algorithms", package: "apple.swift-algorithms"),
            ]
        ),
    ]
)