Upgrade from Nexus Repository 2
Nexus Repository 3 is a complete redesign that does not include legacy code from Nexus Repository 2. Nexus Repository 3 uses a different storage model for managing components that is far more scalable for non-Maven ecosystems and deployment environments.
While this avoids file system limitations from Nexus Repository 2, it does require a more involved migration process to move to Nexus Repository 3.
The upgrade to Nexus Repository 3 requires creating an upgrade plan:
Review the Feature Equivalency Matrix
Begin with Determine your Upgrade Path
Upgrade your Nexus Repository 2 Instance
Complete the Optimization Steps
Follow the prerequisites for your upgrade method
Feature Equivalency Matrix
Nexus Repository 3 represents a complete rewrite of architecture and functionality. Some features from Nexus Repository 2 are no longer available in Nexus Repository 3. The matrix below details features replaced or removed in Nexus Repository 3.
Repository 2 Feature | Equivalent | Note |
---|---|---|
Analytics | ||
Automatic Routing | ||
Browse Remote | ||
Maven Settings | ||
Non-Sonatype Repository Plugins | Nexus Repository 2 plugins are not compatible with Nexus Repository 3 architecture | |
System Feeds | We have no plans to include System Feeds as the data is specific to the instance where it was generated. Near equivalent functionality is available through auditing and webhooks. | |
Atlassian Crowd | Verify the Crowd application is configured to accept connections from Nexus Repository 3 | |
Branding | The branding configuration is not be upgraded automatically. | |
Custom Metadata | Nexus Repository 3 can associate arbitrary data with any component in any repository format via its tagging feature. However, no automated way to migrate Nexus Repository 2 custom metadata exists. See tagging | |
Enterprise LDAP Servers | Individual LDAP Server configurations are upgraded. Backup Mirror servers are not upgraded. | |
IQ Server Configuration | The wizard clones the IQ Server configuration. The quarantine data is cloned to work with repositories upgraded to Nexus Repository 3. | |
Local User Accounts | ||
LDAP | ||
Manual Routing Rules | See Routing Rules | |
Mapped User and Roles | ||
Privileges | Privilege names are changed during the upgrade. Transitive group privileges are implemented differently. In Nexus Repository 2, privileges to a group repository are inherited to member repositories of that group repository. In Nexus Repository 3 this is not the case. After the upgrade, you may need to manually assign privileges for individual repositories. | |
Procurement | Procurement is deprecated. The Repository Firewall solution provides more comprehensive features. | |
Proxy Repository of maven.oracle.com | See the KB article | |
| ||
Repository Health Check Analysis (RHC) | ||
Repository Targets | ||
REST API | Nexus Repository 2 REST APIs are not compatible with Nexus Repository 3. See REST API | |
Roles | ||
RUT Auth Realm | This is not upgraded automatically as it is a security concern when enabled. Configure this manually inside Nexus Repository 3 when you are confident that Nexus Repository 3 access is protected. | |
Security | ||
Server Settings | ||
Smart Proxy | ||
Site Repositories | Renamed as the raw repository format in Nexus Repository 3 | |
SSL Certificates | SSL certificates trusted in the UI will be upgraded, but not all of them apply. Review trusted certificates after the upgrade. The wizard does not migrate the certificate that Nexus Repository uses for its own HTTPS connection. | |
Staging | Nexus Repository 2 Staging is replaced with component tagging to manage workflow. See Staging | |
User Token | See the prerequisites for upgrading for information on how to include pre-existing user tokens from your Nexus Repository 2 instance when upgrading to Nexus Repository 3. |
Determine Your Upgrade Path
Upgrading from Nexus Repository 2 to 3 requires completely transforming the repository metadata and artifact storage model.
Nexus Repository 3 has a non-destructive built-in upgrade wizard to migrate content from Nexus Repository 2 deployments. While this method is recommended and acceptable for most deployments some caveats must be considered before beginning.
Built-in Upgrade Wizard
Using the upgrade wizard is the preferred method when your deployment meets all of the requirements. In some cases, you may combine this method for the majority of the migration along with other methods for content that falls out of the requirements.
Upgrade to Nexus Repository 2.15.2 and Nexus Repository 3.76.0 Community Edition (CE): both instances must be on corresponding versions of Nexus Repository 2 and 3. Nexus Repository 3 CE deployments need to migrate to 3.76.0 deployed with Java 17 using an H2 database before upgrading to later versions.
Professional (Pro) License: Upgrade to the latest version with an external PostgreSQL database.
For upgrading to a fresh Nexus Repository 3 instance This method is not supported when already using Nexus Repository 3.
Use your Pro license for both deployments You cannot upgrade when only one instance has the Pro license installed.
Repositories must use unique names Nexus Repository 2 allowed different cases for repository names. This is not allowed in Nexus Repository 3.
Exporting / Importing Content
Organizations using both versions of Nexus Repository and needing to consolidate must import the content into Nexus Repository 3 using the Repository Import task.
Already using Nexus Repository 3 Best for those already using Nexus Repository 3 and needing to import Nexus Repository 2 content into the existing Nexus Repository 3 instance.
Configuration and component metadata are not migrated This moves repository contents, not the configuration. Metadata such as creation and last download dates are set to when the content is imported into Nexus Repository 3.
This may complicate cleaning up repositories after importing.
Cannot import to proxy repositories Proxy repositories from Nexus Repository 2 would need to be imported as hosted repositories.
Importing through Proxy Repositories
Using proxy repositories is an effective way of making Nexus Repository 2 content available in Nexus Repository 3 while both versions are used in production.
Migrate content in active use Only the content actively requested in Nexus Repository 3 is fetched from Nexus Repository 2. This may be a method to separate unused content.
Must maintain Nexus Repository 2 The Nexus Repository 2 must be available for Nexus Repository 3 to fetch content so both environments would need to be maintained for a long enough amount of time for all content to be migrated. This method may be difficult to know when Nexus Repository 2 is no longer needed.
Self-hosted content is in proxy repositories The content from Nexus Repository 2 is stored in proxy repositories in Nexus Repository 3.
Requires substantial configuration This method requires creating a proxy repository for every repository to migrate from Nexus Repository 2. We recommend adding these proxies to group repositories so that hosted content is accessible by a single endpoint.
Upgrading Considerations
Highly Available Architecture is Not Supported The upgrade wizard was not designed for and does not support upgrading with Nexus Repository 3 configured for a multi-node highly available deployment.
Upgrade with Nexus Repository 3 as a single node deployment before upgrading to the resilient architecture.
Hard Linking Hard Linking does not require the file system to copy components as it updates the file pointer to the content stored on the disk. While limited to in-place upgrades, this method greatly shortens the time and storage required to run the upgrade.
We highly recommend using Hard Linking when possible.
See Hard Linking
Cloud Object Storage Migrating to Cloud Storage takes 3 times longer than moving to storage on a file system. We recommend importing to a file-based blob store on a low-latency file system before migrating content to a cloud object store.
Nexus Repository 2 API and Plugins Scripts written using the Nexus Repository 2 APIs are not compatible and do not work for Nexus Repository 3. Plugins need to be rewritten using the Nexus Repository 3 API.
IQ Server Configuration The upgrade wizard clones the IQ Server configuration and data to work with the repositories upgraded to Nexus Repository 3.
Repository Firewall Quarantined Component The upgrade wizard transfers approved and quarantined components to the Nexus Repository 3 instance. For manual migrations, pre-fetch approved components before enabling Firewall quarantine on the new repository. Use the Repository Results REST API to export the audit report from the source repository to request the same components from the proxy in Nexus Repository 3. Enable Repository Firewall quarantine on the repository once the allowed components are proxied.
RPMs in Maven Repositories Storing RPMs in Maven repositories was a stopgap in Nexus Repository 2. Nexus Repository 3 natively supports RPM in their own repository format. The upgrade wizard is unable to separate RPMs from Maven repositories with this configuration. Migrating Maven repositories with this configuration set is disabled by default.
We recommend using the import task to move RPMs into Yum-hosted repositories in Nexus Repository 3. You must disable the Yum configuration capability on Maven repositories in Nexus Repository 2 to include these repositories in the migration wizard.
Upgrade Wizard
Nexus Repository includes the Upgrade Wizard used to migrate Nexus Repository 2 to a new Nexus Repository 3 instance. Upgrading to Nexus Repository 3 using the Upgrade Wizard is the preferred method.
Meet the prerequisites for upgrading.
Understand the Upgrade Process
Determine the data transfer method
Take steps to optimize upgrade performance
Configure the Upgrade Capabilities
Follow the step-by-step guide through the wizard
If you need to start over, reset your upgrade
Configure the legacy URL paths when needed.
Prerequisites for Upgrading
A successful upgrade from Nexus Repository 2 requires planning, decision-making, and testing before attempting the actual upgrade.
The Nexus Repository 3 instance must be a new single-node instance The upgrade tool replaces the configuration in Nexus Repository 3. The wizard is expected to only run once. The upgrade tool is not supported with Nexus Repository 3 in a highly available deployment.
Both Nexus Repository 2 and Nexus Repository 3 have the same license type When upgrading both versions must have the same licensing setup. Use the same license file in both instances. Instances on the same server share the same license.
The Nexus Repository 2 instance is on the latest version Community Edition (CE): upgrade to the 3.76.0 release with H2. After the upgrade, migrate to the latest release with PostgreSQL.
Professional (Pro): upgrade directly to the latest version with the PostgreSQL database.
The work directory and files must be owned by the OS user with no zero-length files Use the following Linux command to find files in the work directory not owned by the 'nexus' user as well as zero-length files:
find . \! -user nexus -print
Nexus Repository 2 repositories must use distinguishable names IDs of repositories and repository groups in Nexus Repository 2 that differ only by case will not be accepted during an upgrade to Nexus Repository 3 (example version 2 IDs: myrepoid vs. Myrepoid).
Nexus Repository 2 roles cannot have the ‘nx2’ prefix This prefix is reserved for Nexus Repository 2 system privileges. Privilege created with the prefix ‘nx2' does not correctly reference its roles. While privileges with this prefix are ported over, they do not contain the assigned permissions.
Test the upgrade using a backup in a test environment first We recommend running the upgrade wizard in a test environment to see when errors may occur and set expectations.
Set blob stores to outside of the sonatype work directory For resilient deployments, we recommend setting the blobstore outside of the default work directory.
See the Storage Guide)
Manual Upgrade Methods
When upgrading a Nexus Repository instance or consolidating to an existing instance, you can manually upgrade repository content into Nexus Repository using any of the following methods:
Using the Repository Export/Import features
Including external proxies in a group repository
Running scripts using the REST API
Manual upgrade methods have a few considerations:
Expect to spend a fair amount of time in planning and executing any upgrade
You cannot import or export repository configuration
Some data duplication is required
Prerequisites
Before proceeding with any upgrade, we recommend taking the following steps:
Prerequisite | Required/Recommended | Details |
---|---|---|
Access to Repository Storage | Required |
|
Ensure your Nexus Repository 3 instance is using an external PostgreSQL database | Recommended | We highly recommend that you set up your Nexus Repository 3 instance with an external PostgreSQL database. See configuring an external PostgreSQL database or migrating an existing Nexus Repository 3 instance to a PostgreSQL database. |
Back Up Infrastructure | Recommended | |
Do a Test Run | Recommended |
|
Use Import Hard Links | Recommended |
|
Avoid Importing Directly to S3 | Recommended |
|
Firewall Repositories | Optional |
|
Export/Import Manual Upgrade Method
Using Repository Export and Repository Import is the easiest and fastest manual method to copy a repository's contents from one Nexus Repository instance to another.
Considerations
You can directly import Nexus Repository 2 repository content from where it is stored on disk.
The import task will maintain the created date, last updated date, and the last downloaded date attributes from Nexus Repository 2.
In cases where the content in the source directory changes or the process is interrupted, you can use these tasks to only add the missing/additional content.
The tasks must be manually created; you cannot use scripts or the API.
You will need to create and run individual tasks for each repository.
Multiple tasks will not run at the same time.
Steps for Nexus Repository 2 to 3 Export/Import Upgrade
Ensure that your Nexus Repository 3 instance has file system access to the Nexus Repository 2 storage; consider using a backup if Nexus Repository 2 is located on a different server.
On your Nexus Repository 3 instance, create the target repository to which the content will be imported.
Note
As a best practice, ensure that the blobstore for the target repository is on the same storage as the source repository; this will allow you to use hard linking (recommended).
Under Administration → System → Tasks on the Nexus Repository 3 instance, create a new Repository - Import external files task.
Set the source directory to the folder where the Nexus Repository 2 repository is stored.
Optionally, select Enable Hard Links (Recommended).
Run the task.
For testing, you may stop the task before it is completed.
Review the importing documentation on how to reset the import process.
When finished use the Move Blob Store steps to use a different storage disk or S3 object store
Note
If you have a lot of data to copy into the repository, this upgrade may take some time. Consider using the Proxying Repositories method below to make the source content available while waiting for the import tasks to complete.
Proxying Repositories Manual Upgrade Method
One common use case for proxy repositories is to use them to make content immediately available on a new Nexus Repository instance while slowly moving content as it is requested.
Considerations
This upgrade will only copy content that is actively being requested by development and production. This may be an effective way to avoid moving unused content.
Nexus Repository fetches imported components through the proxy over HTTP(S), which can be very slow.
You will need to maintain both repository instances until your new instance contains all needed content.
You cannot convert a proxy repository to a hosted repository when the process is complete.
Steps for the Proxying Repositories Manual Upgrade Method
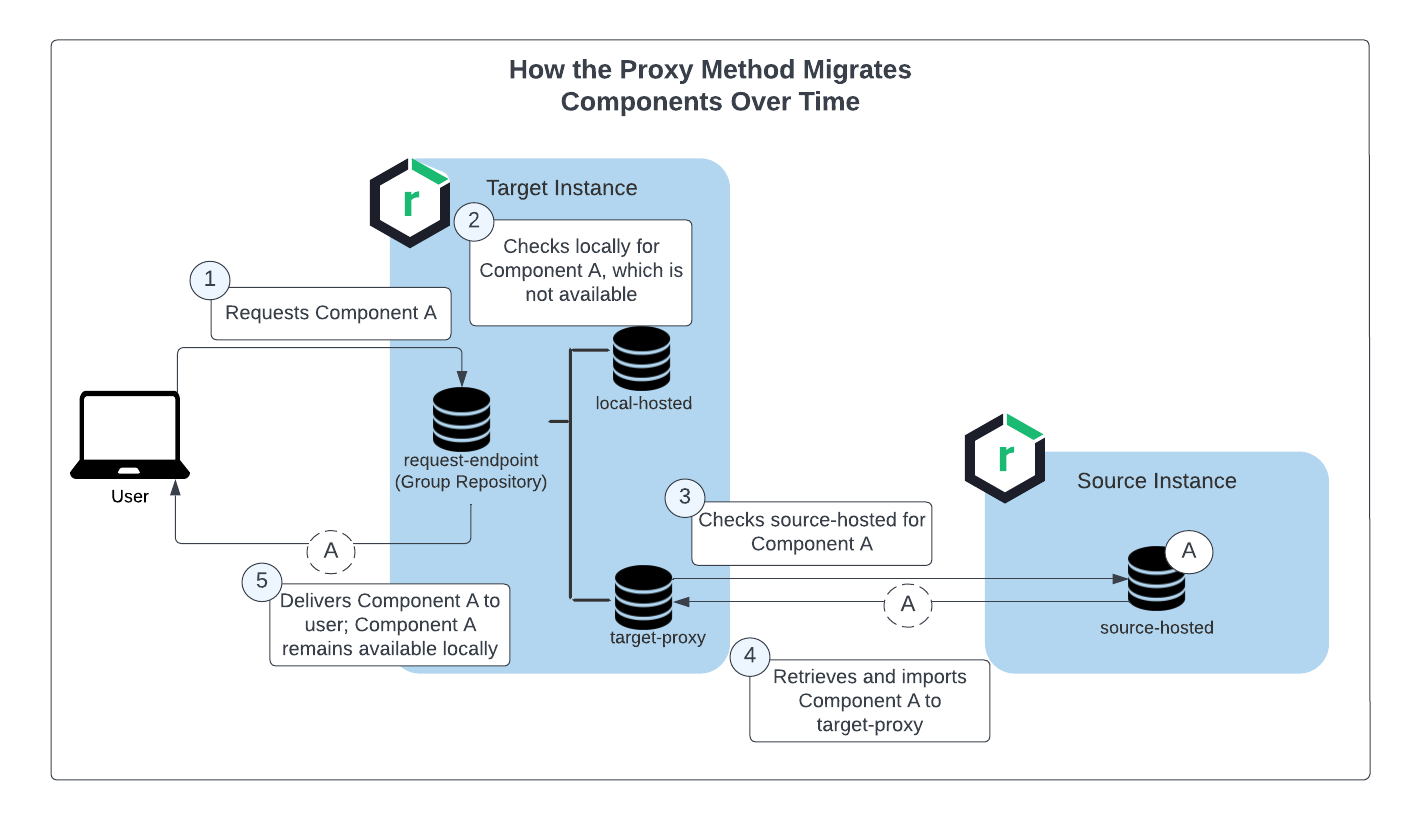
This method involves creating a proxy repository (called target-proxy
in the example below) on the new Nexus Repository 3 instance and having that proxy repository use the URL of hosted repository on a source instance (called source-hosted
in the example below).
When a component is requested from but not found on the target repository group (called request-endpoint
in the example below), Nexus Repository downloads the component from the hosted repository on the source instance through the proxy repository. This is demonstrated in the diagram below:
![]() |
This configuration can be used until the upgrade is complete.
Upgrading Staging
This topic provides Nexus Repository administrators valuable information about the change in staging implementation between Nexus Repository 2 and 3 as well as guidance on migrating your data and processes. For detailed information on using the staging feature in Nexus Repository 3, see the Staging topic.
Staging in Nexus Repository 2 vs. Nexus Repository 3
In Nexus Repository 2, staging is done through the staging suite; in Nexus Repository 3, staging is done through tagging and REST API calls. This difference means that upgrading from Nexus Repository 2 to 3 lets you go from a dynamic repo-based model to a tag-based model.
When designing staging in Nexus Repository 3, the Sonatype Nexus Repository team had a chance to look for areas of improvement in Nexus Repository 2 and then develop the new staging feature to mitigate these issues.
Some of the issues identified in Nexus Repository 2 staging were as follows:
It only works for the Maven2 format.
Deployment/approval workflows are increasingly external to Nexus Repository.
It doesn’t scale. Failing to apply proper housekeeping controls means there can be 1000’s of repositories, leading to significant performance problems in Nexus Repository 2.
It’s easy to lose track of build identity after promotion (the staging repo goes away).
The Nexus Repository team worked to resolve these issues and develop features in Nexus Repository 3 that let you do the following:
Administer access control to in-house components at different phases of the SDLC. Components can be restricted until fully tested.
Store components in a single hosted repository for each stage, while identifying individual builds and managing retention periods by stage.
Move components between release stages using the REST API.
Associate custom metadata to builds as components are uploaded to the repository.
Manage workflows with external CI/CD tools.
A side by side comparison:
Staging in Nexus Repository 2 | Staging in Nexus Repository 3 |
---|---|
Workflow defined in Nexus Repository 2 | Workflow defined externally (i.e., Jenkins) |
Each build is a separate repository | Each build is a tag |
Hundreds of repositories accumulate | Small, fixed number of repositories |
Builds are absorbed into release repo | Build metadata outlives promotion |
UI-driven | Powered by REST, no UI |
Maven2 only | Maven2, raw, Docker, npm, Nuget, YUM |
Rules defined in Nexus Repository 2 | Rules invoked externally by CI/CD |
“Staging” is a feature | Toolkit APIs used to build staging |
Due to the extent to which we redesigned staging in Nexus Repository 3, it is not compatible with Nexus Repository 2 staging. Nexus Repository 3 staging provides a set of flexible building block capabilities that can be combined and arranged as needed to accommodate your organization’s software build and release pipeline. The set of REST endpoints that expose these capabilities allow for easy integration into CI/CD systems, and are easily customized to the workflows or client tooling and technologies needed to interact with them.
Benefits of Tagging and Staging in Nexus Repository 3
There are several advantages to upgrading to Nexus Repository 3:
Flexible Workflow
Staging is a set of powerful REST endpoints that are highly customizable to your environment. This new implementation makes build deployment configuration more flexible for teams as they expand beyond CI server usage to the staging repository and the ability to dynamically select builds for promotion.
Staging for Nexus Repository 3 also helps empower teams to take control of the build deployment process using advanced metadata capabilities. This includes deciding how the metadata changes along the release workflow, as well as how to isolate the right builds for the right teams.
Tags
Staging also works closely together with our tagging feature. In Nexus Repository Pro, staging works by moving components across hosted repositories. For instance, you could have hosted repositories for development, UAT, and production. You can then promote software components matching your organization’s software development lifecycle phases by moving components between these hosted repositories. This is where the tagging feature comes in. Tagging in Nexus Repository 3 is more powerful because you can easily group multiple builds and promote them as if they were a single unit.
For example, a complex project like Nexus Repository has thousands of files and all sorts of components that go into a build. The Nexus Repository teams needs a way to take all of these components that span multiple different coordinates and group them together in a way that lets us know it’s a single build. You can use the tagging REST endpoints to create and delete tags, list all tags, and attach metadata to tags. This is the Nexus Repository 3 equivalent to custom metadata.
As you can see from the example above, using tags provides a way to group and move your artifacts. Nexus Repository 3 provides several means for tagging, which usually happens on upload, but can also be done after upload as well. You can tag components with your automated CI/CD processes using the Jenkins Platform plugin. Alternatively, you can also tag components during upload within the UI.
Path from Nexus Repository 2 to 3
Now that you understand how staging in Nexus Repository 3 works, the next step is redefining your process from Nexus Repository 2 to the new instance. Upgrading to Nexus Repository 3 will give you a staging feature with a set of extremely configurable building blocks that can be adapted to your organization’s needs.
Although there is no direct upgrade path from Nexus Repository 2 to 3, this section will go over some steps you can take to get started.
A basic setup workflow for staging in Nexus Repository 3 might look something like this:
Ensure that your upgrade from Nexus Repository 2 to Nexus Repository 3 is complete.
Identify the staging workflow from your Nexus Repository 2 configuration.
Create matching hosted repos in Nexus Repository 3.
Incorporate the stages of your agile software development lifecycle into the Nexus Platform Plugin for Staging.
Add a tagging call to the build.
Update the Nexus Repository 2 Maven calls to the Nexus Repository 3 REST calls.
Associate custom metadata to tags. Custom information is an extension of tagging. See Viewing Tags for more info.
Use the Move REST API endpoint to promote tagged components among the hosted repos.
Use the Delete REST API endpoint to delete tagged components among the hosted repos.
Run a cleanup task to delete tags you no longer need.
The above steps represent a basic scenario. Our REST APIs give you a lot of flexibility to make this more robust and well integrated into your CI/CD pipeline.
For more information on our staging workflow, please see the staging and tagging topics in our help documentation.
Best Practices and Troubleshooting
Although migration from Nexus Repository 2 staging to Nexus Repository 3 staging is not supported, there are a few things you can do to make the move easier. Here are a few ideas to help you make the switch:
Keep in mind that this is an opportunity to start fresh with a new set of features that are compatible with modern CI/CD pipelines.
Review what worked in Nexus Repository 2 staging and what didn’t. This can help you determine what needs to be implemented similarly and where there are areas for improvement.
For example, you may need to keep your Nexus Repository 2 staging repos for data retention purposes. These types of requirements should be taken into account.
When you upgrade, any “in flight” staging repositories in Nexus Repository 2 are not migrated. This means upgraded components in a build promotion repo or staging repo are not moved. This is an important setup step that should be thought about prior to upgrade.
Get familiar with concepts and terminology, such as the following:
Tag names are a string (or label) that are the primary key for what gets “staged.”
Metadata is extra information.
You cannot stage or create permissions based on metadata.
Invest your time in establishing a strategy for naming tags and your management approach for tags. For example, think about things like the following:
Will tags be used? (This may depend on your organization’s approach to naming builds and repos.)
How will tags be routinely aged off?
What is the best way to implement tag creation and assignment to your artifacts?
Keep in mind the benefits of staging in Nexus Repository 3:
You can control who can see in-house components at different parts of the SDLC, so they aren’t used before they’re ready.
You can batch components together and easily identify builds.
Stagings REST APIs are powerful and flexible.
You can control the workflow from your CI/CD pipeline.
The “toolkit” style implementation means it supports other use cases.
Maven and Jenkins integration (e.g., automatically tested, manually tested, signed, approved, etc.).