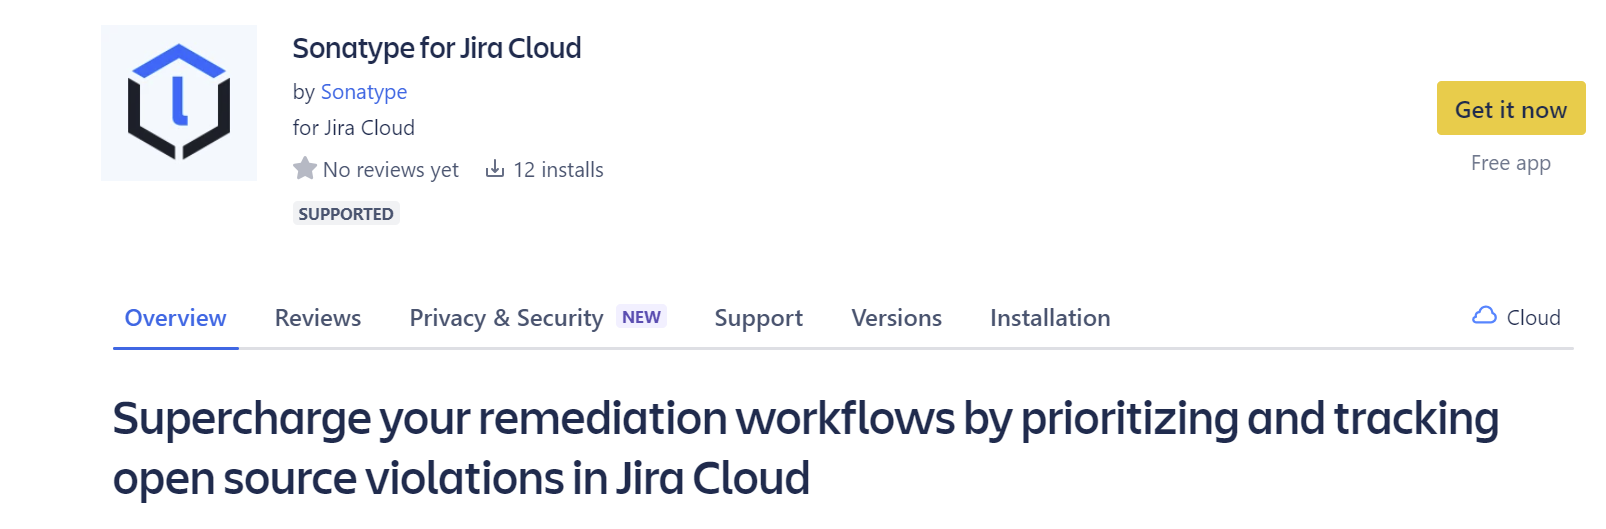
Sonatype for Jira Cloud
Sonatype for Jira Cloud automatically creates issues in response to new violations as they occur during your policy evaluation. Prioritize and track the remediation of open-source component risk directly in your development workflow.
 The Sonatype for Jira Cloud integration is available on the Atlassian Marketplace.
Steps for Configuration
To perform as a Jira Cloud site admin:
Install Sonatype for Jira Cloud
Configure the integration in Jira Cloud
Configure the integration per project to receive tickets
To perform as IQ Server and Policy administrator:
Add webhook to the Jira Cloud in IQ Server
Set up notifications on the Lifecycle policy
Install Sonatype for Jira Cloud
Install the integration directly from the Atlassian Marketplace
Configuration Requirements
A Sonatype Lifecycle license with IQ Server version 168 or higher.
The latest Sonatype for Jira Cloud integration installed.
A webhook endpoint from Jira with a secured secret key.
Warning
The secret key will be created by your team to encrypt requests. Keep the key secret as it will have permission to send requests to add issues in your Jira instance.
Configure Sonatype for Jira Cloud
After installing the plugin we need the webhook to send requests to Jira:
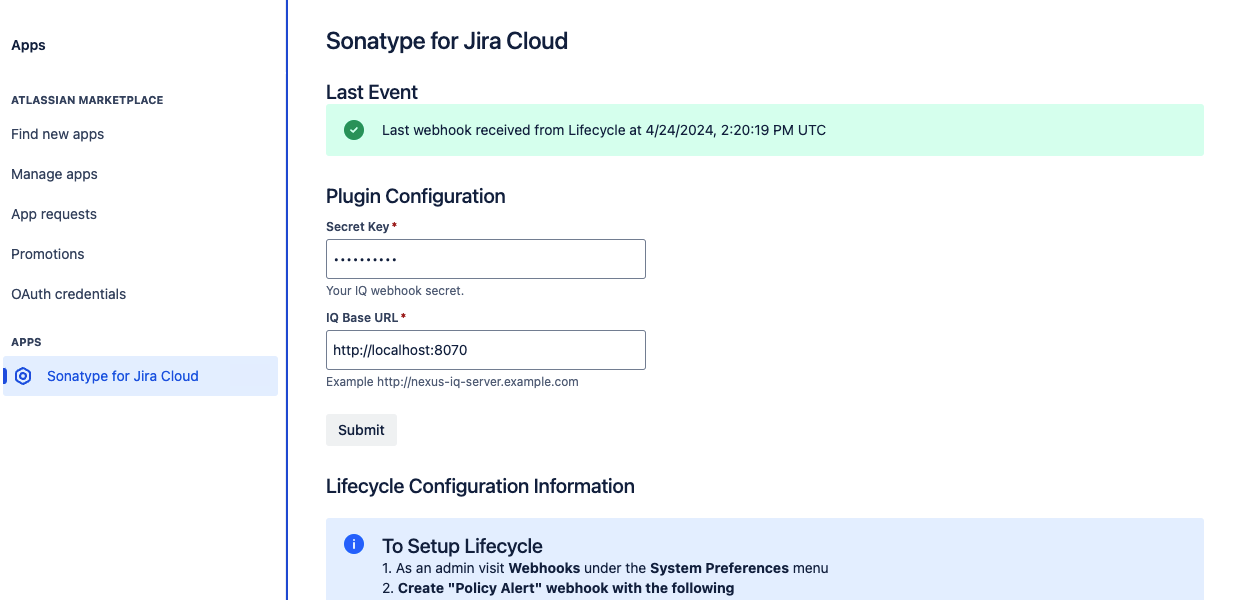
In Jira, log in as an account with permission to manage applications
From the top navigation bar, select "Apps" and "Manage apps"
Select "Sonatype for Jira Cloud"
Fill in the secured secret key for managing webhooks
Add the IQ Server Base URL for report links
Select Submit to save the entry
Copy the webhook URL to configure the IQ Server webhook in a later step
Assign Sonatype Lifecycle Applications to Jira Projects
You must assign Sonatype Lifecycle applications to your Jira projects before new violations are created as issues.
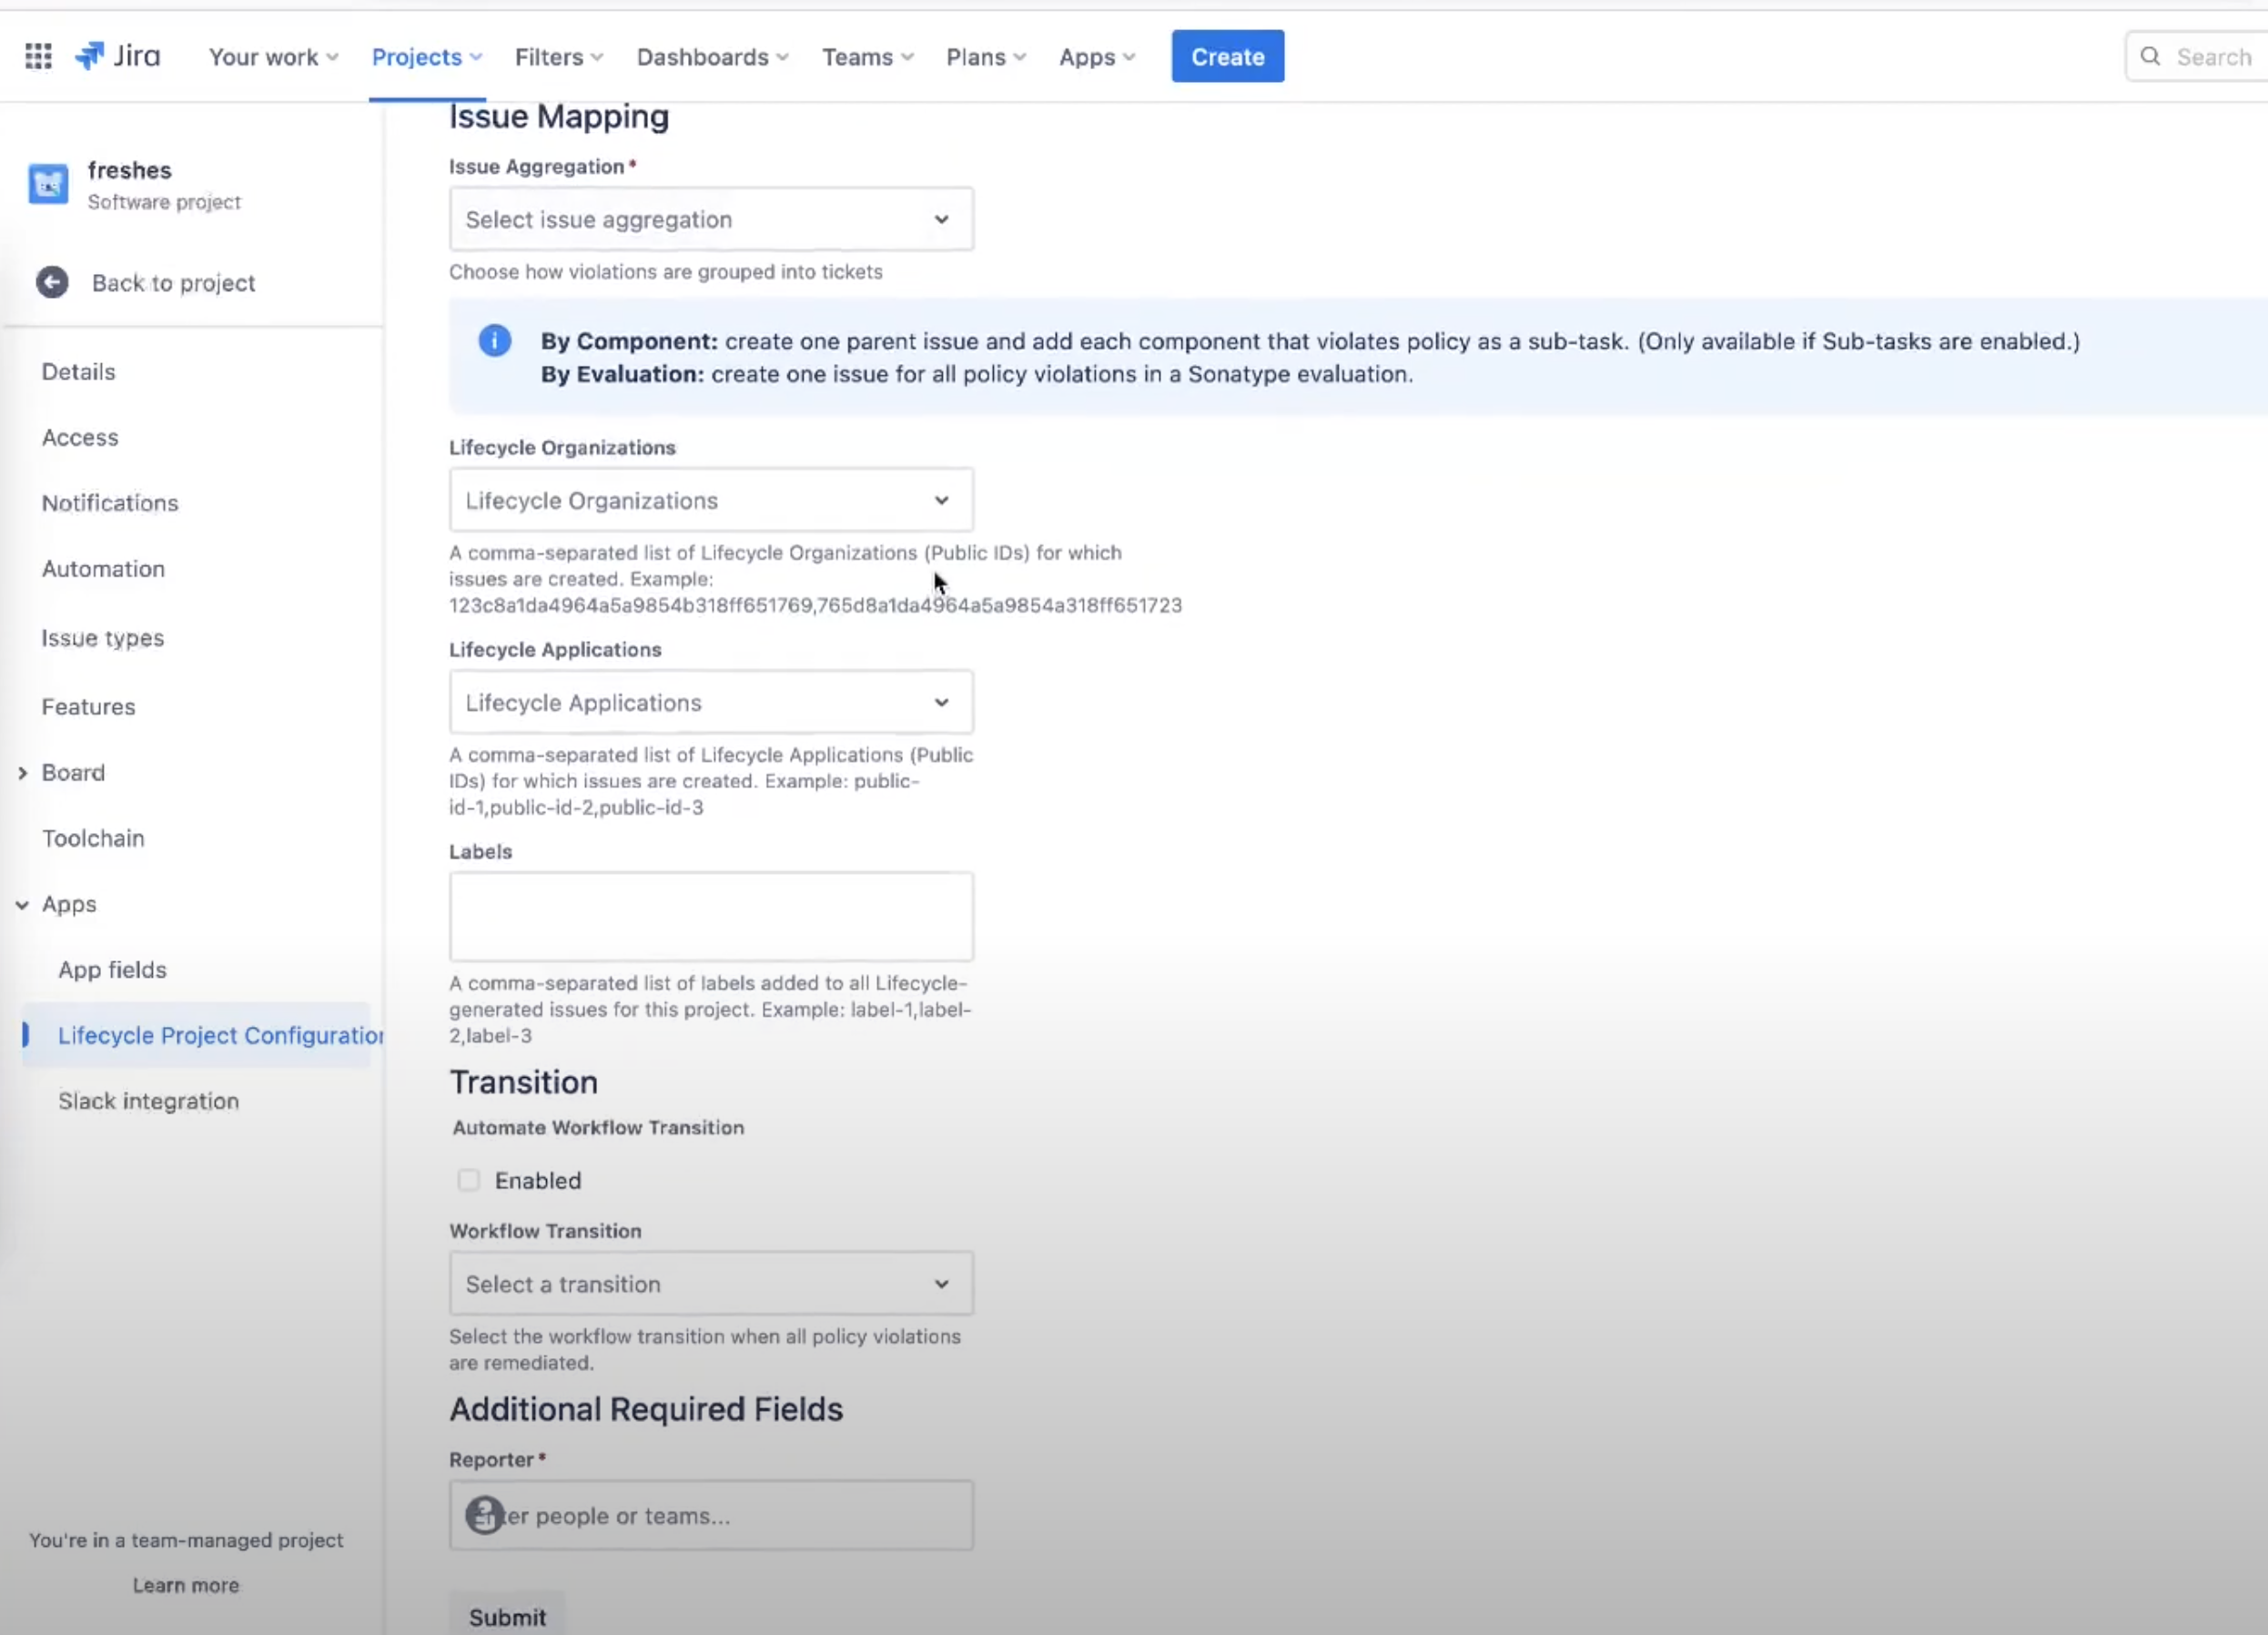
Navigate to your Jira project
Select
Project SettingsFrom the left menu, select "Lifecycle Project Configuration"
Select the issue type to create violations
The available options are: Task, Story, Bug, Epic
Select the issue aggregation method
By Component - Create a subtask for each component with violations
By IQ Evaluation - Create a single issue that lists all violations across all components
List the Lifecycle Organizations and Applications for the project
Include a comma-separated list of Organizations or Application IDs from Lifecycle
Select the Organizations and Applications from the drop-down when using the 'Organization and Application Summary' webhook event type
Set the optional Workflow Transition state to refresh the ticket when the violations are resolved in Sonatype Lifecycle
Fill in the required fields based on the issue type, i.e., Reporter (the account associated with the automatically-created tickets.)
Create a webhook in the Lifecycle server
The Lifecycle server webhooks are used to communicate with the plugin
Log into the Lifecycle server as an administrator
Select
Webhooksfrom theSystem Preferencesgear icon in the top right menuSelect
Add a WebhookPaste in the webhook URL from the plugin
Include a meaningful description to be displayed as a notification option
Use the same secret key entered in the plugin configuration
Set the event type to
Violation AlertOptionally, create a webhook with the
Organization and Application Summaryevent typeThis event is used to populate the applications dropdown from the project configuration
Select
Createto save the webhook
Note
The Organization and Application Summary webhook event may result in slow performance and potential security concerns for Lifecycle servers with hundreds of applications.
The assigning applications dropdown is only present when this webhook is configured. Instead, you will need to provide a comma-separated list of organizations and application Ids.
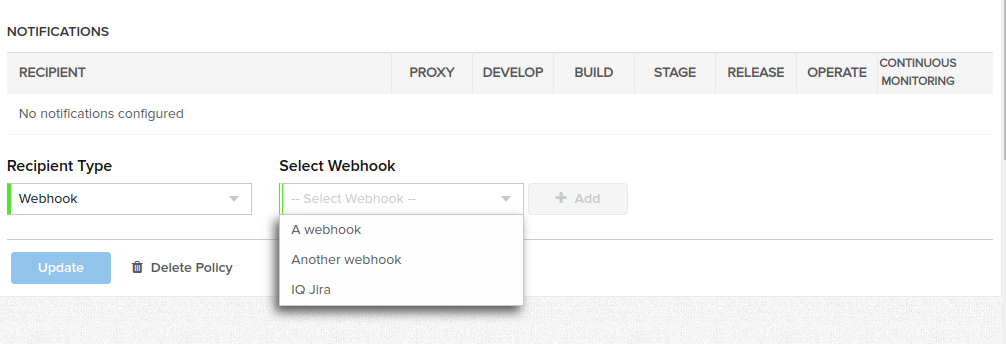
Configure Notifications on Policies
Not all policy violations require a Jira ticket to be created whenever it is found. Notifications in Lifecycle are set on each policy for the stages you wish tickets to be created. For example, creating tickets on all security-critical and security-high violations at the build stage. The following steps will need to be performed for each policy violation you will want to configure a Jira notification for.
Sign into an account with policy administration access permissions
From Orgs and Policies selection the policy to edit
Select Webhook from the Recipient Type drop-down menu
Select the appropriate Webhook from the Select Webhook drop-down menu
Click Add to add the notification
Specify the stage(s) to create notifications for (build, release, etc)
 |
Review violation tickets within the plugin
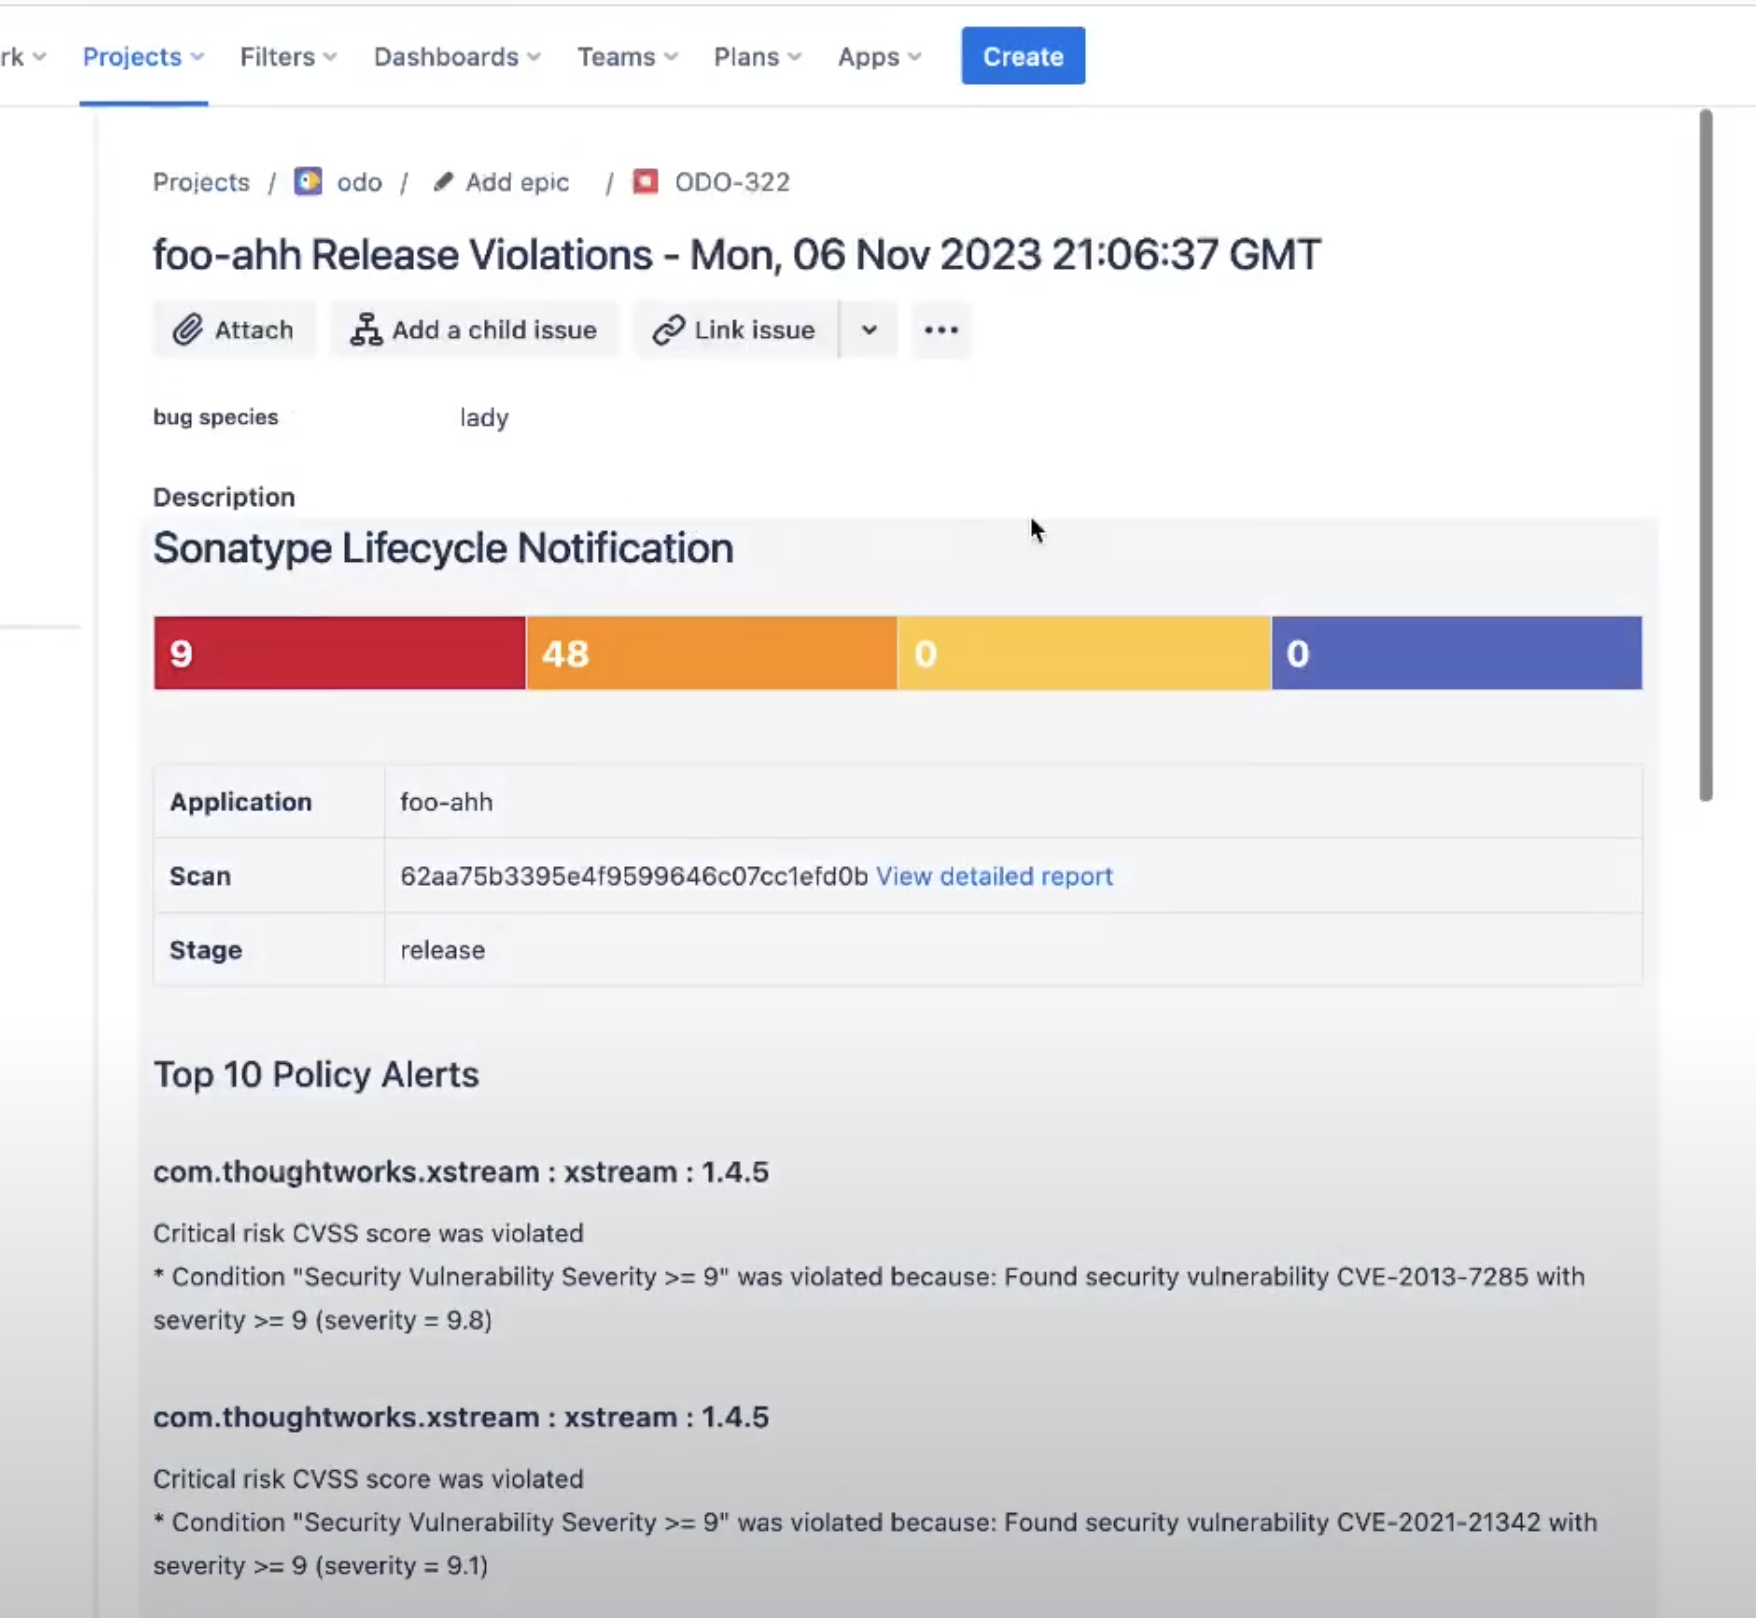
When Lifecycle detects violations, new issues are created on the project board with the New status.
Example of issue aggregation of By IQ Evaluation
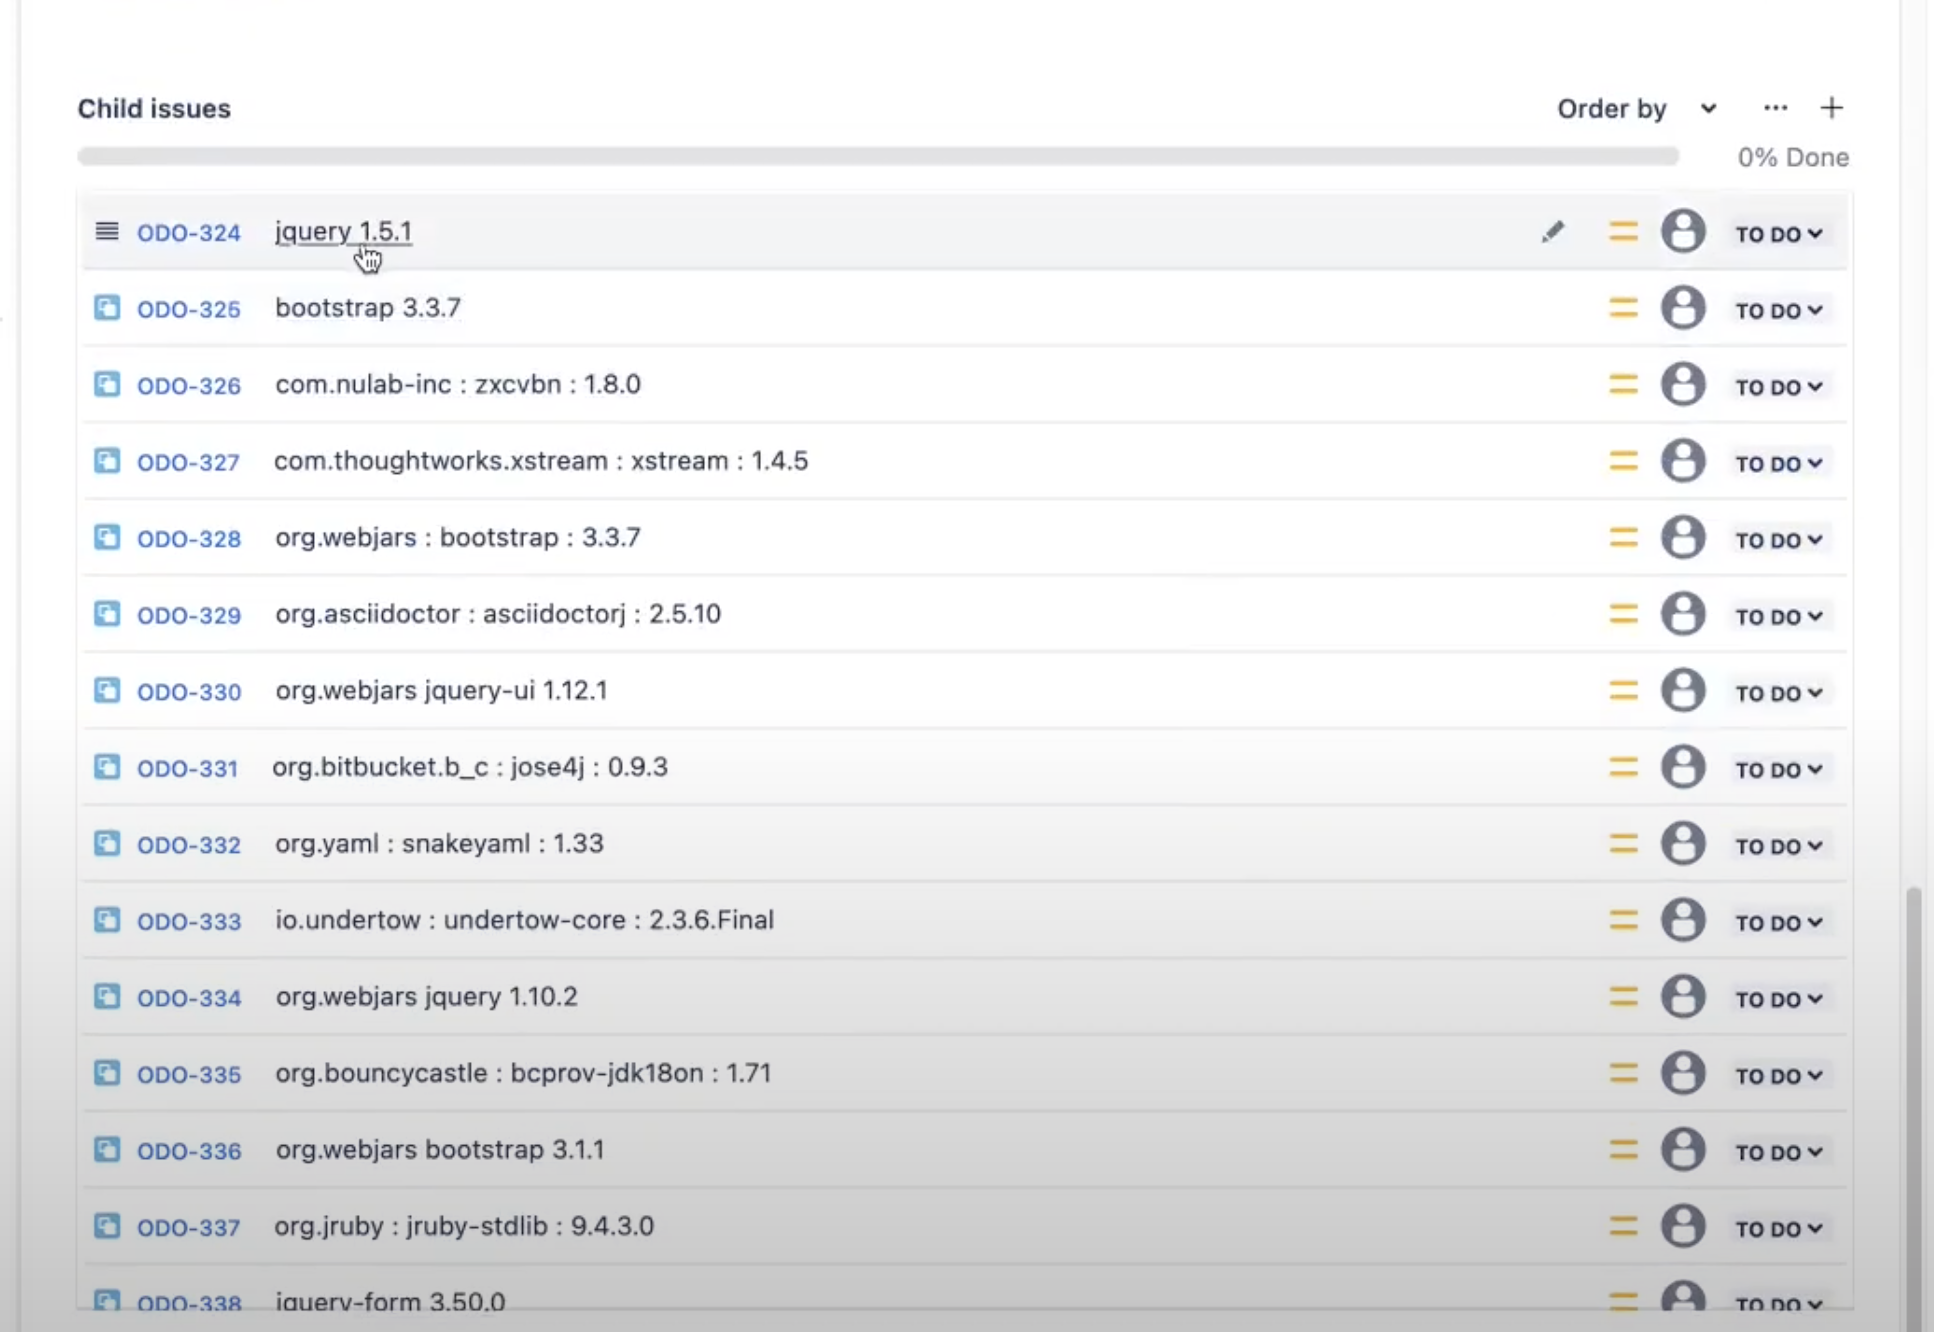
A subtask is created for each of the components attached to the primary report scan ticket for the issue aggregation of By Component
The following fields are populated as follows:
Type: Corresponds to the selected issue type on the mapping page.
Labels: Corresponds to a selected label on the mapping page.
Reporter: Corresponds to a selected reporter on the mapping page.
Priority: Lifecycle threat level 10 is mapped to the highest Jira priority with the threat of 0 is mapped to the lowest priority. Additional priorities are assigned using a linear function.
Threat Level
Jira Priority
9-10
Highest
7-8
High
4-6
Medium
2-3
Low
0-1
Lowest
Note
Priority names for your organization can be different if they've been customized in Jira settings by a Jira admin.
Supported and unsupported field types
Default values are required for mandatory fields in Jira. The plugin will ignore the unsupported fields if they are marked optional in Jira.
The supported fields are: Number, Paragraph, Short text, Select list (single choice), Select list (multiple choices), URL, Radio, Labels
Logging Details
In Sonatype for Jira Cloud's logs, we only record the IQ payload from webhook events, including whether they were processed successfully and any error messages. We do not capture or store any data from Jira itself; our logging is strictly limited to IQ content and metadata automatically provided by Jira.
Jira Integration troubleshooting tips
Check that policy notifications are sent to the Jira webhook.
Jira issues are only created for new violations.
No Actionis taken when the violation has already been sent to Jira.
Verify the webhook URL matches between the Lifecycle server and Jira.
Check the Sonatype for Jira Cloud configuration page on Jira for error messages. The message box will display the status of the last webhook received from the Lifecycle server.
At least one application or organization needs to be mapped to the project.
Check that the violation alerts are mapped to the correct Jira project.
Check that the evaluation stage matches the configured webhook notification.