Configure Crowd Integration
Only available in Sonatype Nexus RepositoryTM Pro. Interested in a free trial? Start here.
To administrate Nexus Repository Crowd configuration via capability, you need the nx-capabilities privilege assigned to your user. To access the Atlassian Crowd panel nx-crowd privilege is needed.
Enable the Crowd Capability
Follow the below steps to enable the Crowd Integration:
Select Settings → Capabilities.
Click the Create Capability button.
Select Crowd to open the Create Crowd Capability panel
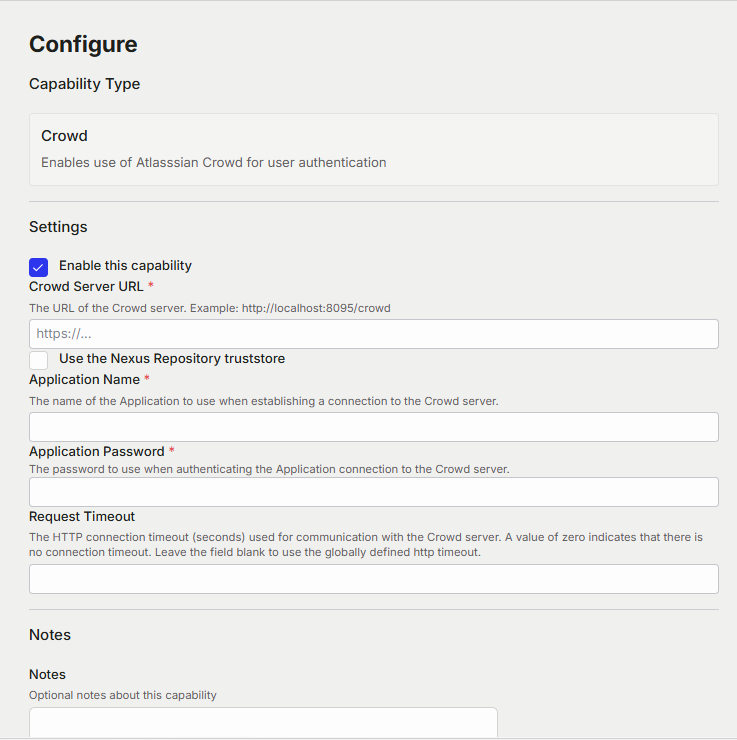
Complete the form by entering the Crowd Server URL and the Application Name and Application Password that correspond to your Crowd application.
This form also includes an option to Use the Nexus Repository truststore. You would check this box if you configured and want to manage Crowd with the HTTPS protocol.
After you create the capability, you will see the Enable Crowd checkbox selected automatically in the Atlassian Crowd panel in the Settings menu under Security. Further, you can see the Crowd server URL, Crowd application name and Crowd application password, all automatically filled in. Additionally, you can configure Connection timeout, a value that specifies the number of seconds the repository manager will wait for a response from Crowd. A value of zero indicates that there is no timeout limit. Leave the field blank to use the default timeout.
You can use the Verify Connection button to confirm your connection to Crowd is working. Pressing Save will save any changes made to the Crowd configuration.
Trust Crowd’s Secure URL (Optional)
Although optional, we advise the connection from Nexus Repository to your Crowd server to use the HTTPS protocol.
If the Crowd certificate is not signed by a public certificate authority, you may have to explicitly trust the server certificate. A common symptom observed is the peer not authenticated message when trying to connect to the untrusted Crowd server.
Adding the Crowd Server Certificate to the Truststore
To add the server certificate of your Crowd server to the trust store, go to SSL Certificates, located in the Settings menu under Security section. In the SSL Certificates panel click the Add Certificate button, which prompts a dropdown menu with two options:
Load from server: where you can enter the full
https://URL from the Crowd serverPaste PEM: where you can enter an encoded, remote certificate generated from Crowd
Read more about centralizing SSL certificates to the Nexus Repository in Access Control.
Configure Crowd Security
There are two approaches available to manage privileges a Crowd user has when they login to the Nexus Repository. You can map Crowd groups to roles or map Crowd users to roles.
Note
Mapping Crowd groups to roles results in less maintenance by Nexus Repository administrators while keeping your users centrally managed inside of Crowd.
Mapping a Crowd Group to Roles
When mapping a Crowd group to a role, you are specifying the permissions (via roles) that users within the Crowd group will have after they authenticate.
Take the following steps to map a Crowd group to a role:
Go to Settings → Roles.
Select Create Role button.
Under Type, select External Role Mapping.
Select Crowd under External Source.
After choosing the Crowd realm, the Role drop-down should list all the Crowd groups to which the Crowd application has access. Select the group you would like to map in the Role field.
Note
If you have two or more groups in a Crowd application with identical names but in different directories, the repository manager will only list the first one that Crowd finds. Therefore, Crowd administrators should avoid identically named groups in Crowd directories.
Before you save, you must add at least one role or privilege to the mapped group. After you have them added using the > button or drag and drop to the Contained or Given areas (respectively), click the Save button.
Saved mappings will appear in the list of roles with a mapping value of Crowd.
Mapping a Crowd User to Roles
Consider the Crowd server user with an id of johnsmith. In the Crowd administrative interface, the johnsmith Crowd realm user is a member of both dev and crowd-administrators groups.
To add an external user go to the Settings → Users. Select the user that needs to be mapped. This will take you to a form where you can assign available roles. You must map at least one role to the Crowd managed user in order to Save.