Sonatype for IDEA
IntelliJ IDEA is a fully-featured integrated development environment (IDE) used for Java development. WebStorm is an IDE for the JavaScript ecosystem.
 The Sonatype for IDEA integration is available on the JetBrains Marketplace.
Supported JetBrains IDEs for Lifecycle Component Analysis
Development Environment | Java (maven) | Node.js (npm) |
|---|---|---|
IDEA Ultimate | ||
IDEA Community | ||
Android Studio | ||
WebStorm |
Installing Sonatype for IDEA
Python analysis removed
Starting in version 4.16.0-01, the Sonatype for IDEA plugin no longer supports Python (PyPI) analysis due to incompatibilities with recent IntelliJ platform releases.
If you require Python analysis, use the last plugin version that supports it: 4.13.0-01 — download nexus-iq-idea-plugin-4.13.0-01.zip.
Download latest version:
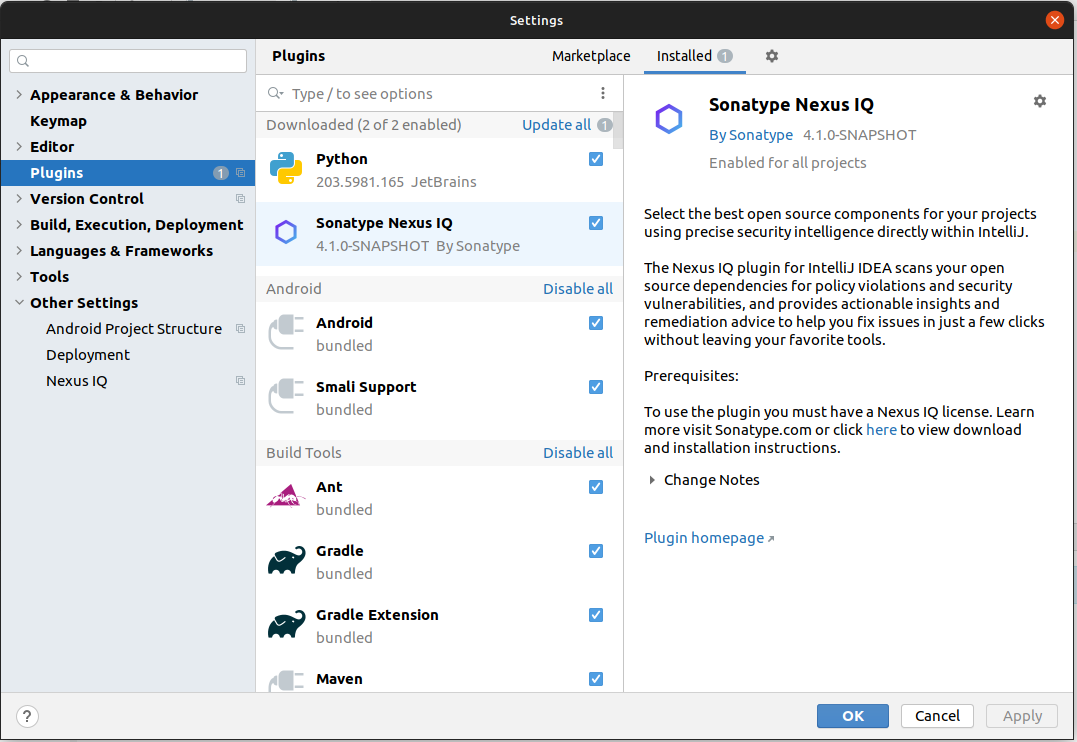
Sonatype for IDEA supports installation via a zip file. Installation is performed using the Settings/Preferences dialog. Select Plugins from the left-hand pane to open the option to install the plugin from disk. From there, browse to the plugin zip file and select it.
 |
Configuring Sonatype for IDEA
After the installation, the plugin needs to be configured to connect to your Lifecycle server. From a project view, click the Nexus IQ icon on the Tool Windows menu, and then click on the gear icon to configure the integration with your Sonatype Lifecycle credentials.
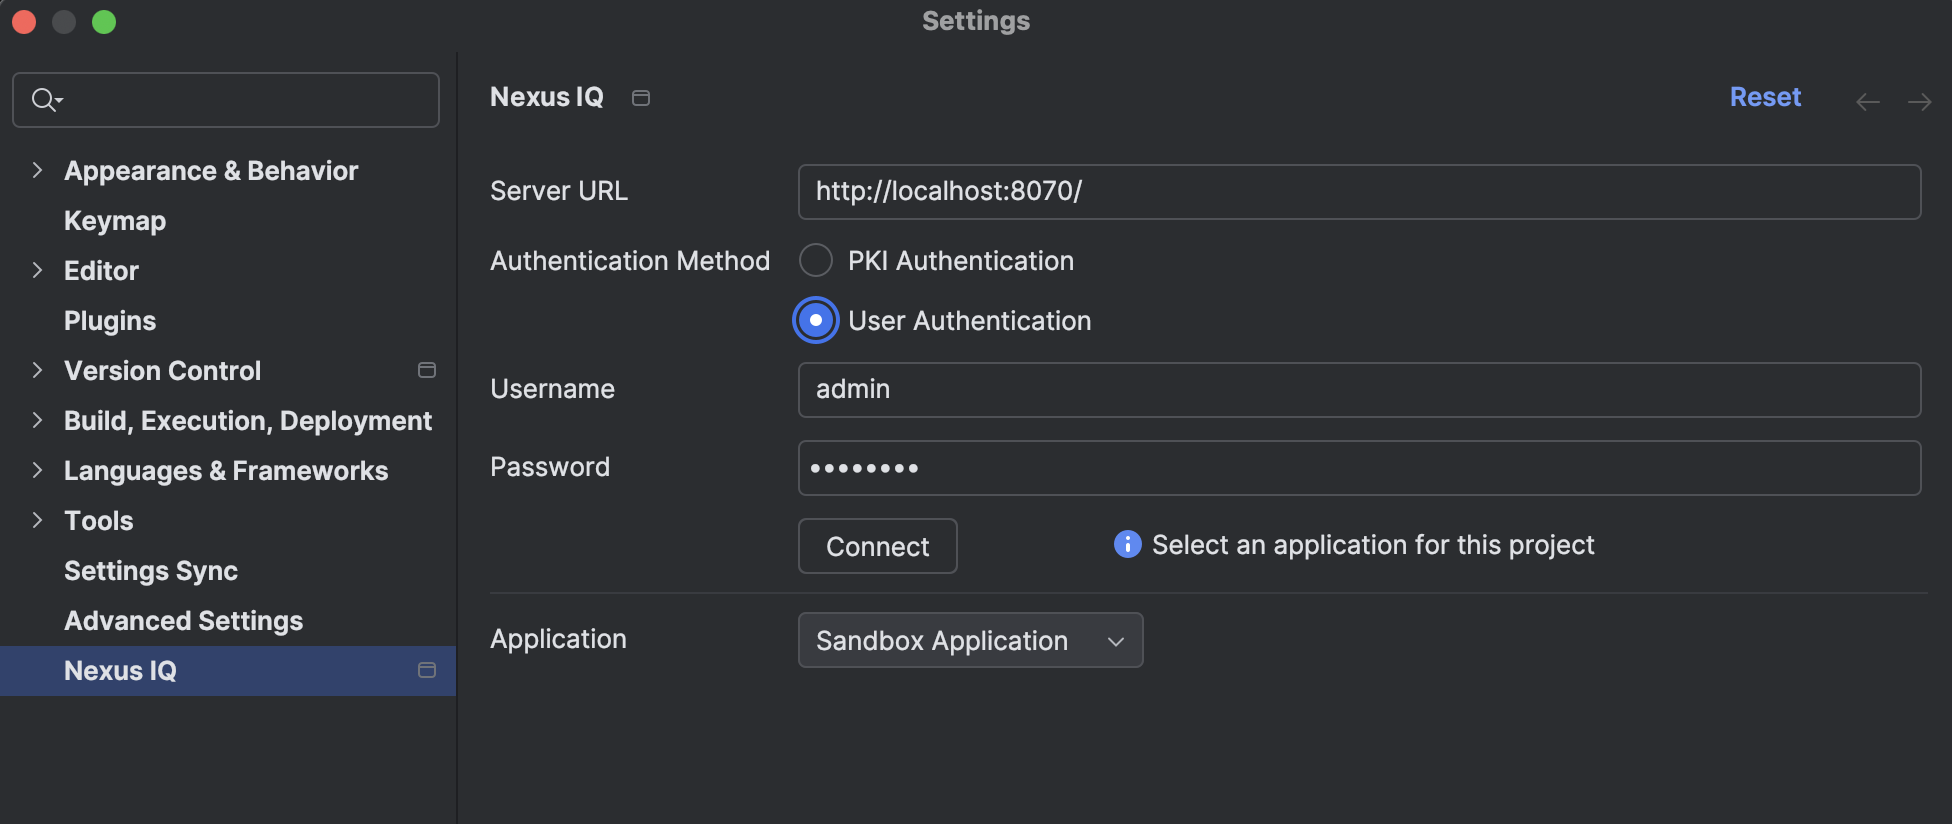
Server URL: Enter the base URL of your IQ Server including a trailing slash. Eg. https://iq.cloud.sonatype.com/
Authentication Method:
PKI Authentication: Delegate authentication to the JVM.
User Authentication: Enter your credentials or user token for the Lifecycle server.
Note
You will be prompted for your IDEA Master Password when saving the Preferences/Settings. This allows IDEA to store your Lifecycle credentials securely.
Once the connection information is provided, select Connect to verify the connection to the Lifecycle server. When connected, select an application from the dropdown. The policies scoped to this application are used when evaluating your IDE project.
When the test Connect reports an HTTP error:
Check your HTTP Proxy Server configuration. When the URL is for an internal hostname, the host may need to be added to the No proxy for the list of patterns.
Have your administrator verify the server request.log shows that your Connect requests have reached the server. The log files may contain more information to debug the issue.
Using the Component Info View
The Sonatype for IDEA tool window can be accessed by clicking the IQ Tab on the bottom tool strip of IDEA. This is also available in View > Tool Windows.
Once configured and the component analysis is completed, a component view is populated with all open source components and their metadata. The list of components reflect an analysis of the project’s dependencies. For Java projects, that include all project libraries. For JavaScript projects, it includes all dependent Node modules. Mixed projects, contain a mix of Java and JavaScript dependencies.
 |
By default, all project dependencies are included in the component list. Scope filters can be applied to adjust which components are visible.
The following scopes are available:
Java components: Compile, Test, Runtime, and Provided;
JavaScript/Node components: Production, and Development;
Right-clicking on any component will bring up a menu of actions. All components allow for the following actions: View Details and Find Usages. Maven-based Java components show an extra action: Open Maven POM.
View Details will open the details screen providing more context to the component.
Find Usages will bring up a list of every module the component is used in. Clicking on a module will display the location where the component is declared, which is either a Maven POM file or a package.json file.
Open Maven POM will open the Maven POM of the component selected.
Multi-Language Projects
The Sonatype for IDEA plugin detects and analyzes components written in different programming languages, within a single project. The project is organized to follow the JetBrains recommended project structure.
IntelliJ IDEA project structure consists of projects and modules. A project can contain source code, tests, libraries in use, build instructions, and configuration files. It may contain one or more modules. When no modules are defined for the project, the project itself is considered a module.
New Modules
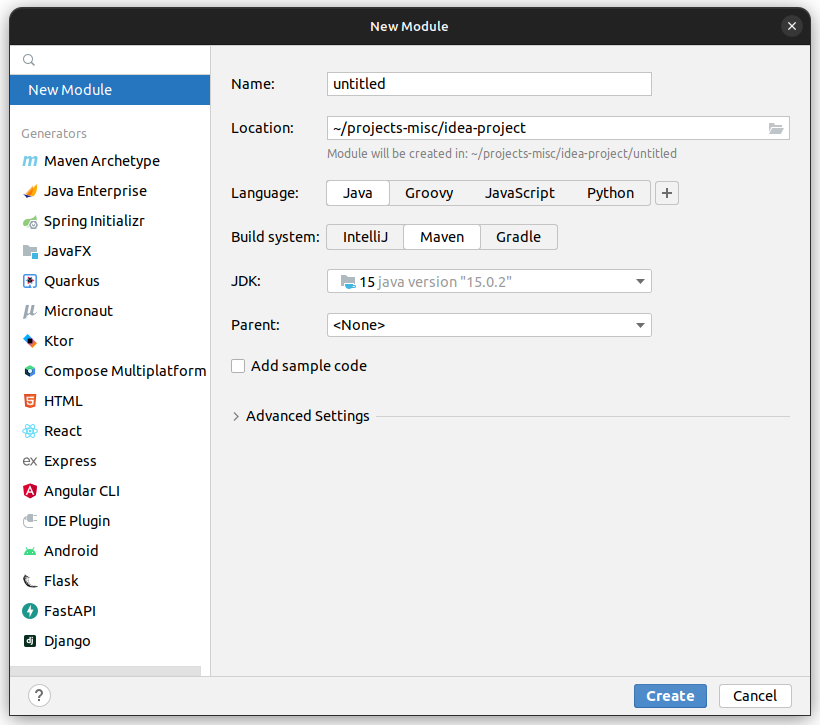
At the time of new module creation, select a language and an optional build system. IntelliJ IDEA uses this language selection to determine the features of the IDE that are available for this module. This is a 1:1 association and works only for a single language.
 |
Modules of existing projects
When an existing project is imported into IntelliJ IDEA, the IDE detects all the modules it contains and assigns a language to each module. You can modify the module detection and structuring after import by navigating to File > Project Structure.
Note
To maximize the results of component detection in multi-language projects, ensure that each module contains files specific to a single language.
Example:
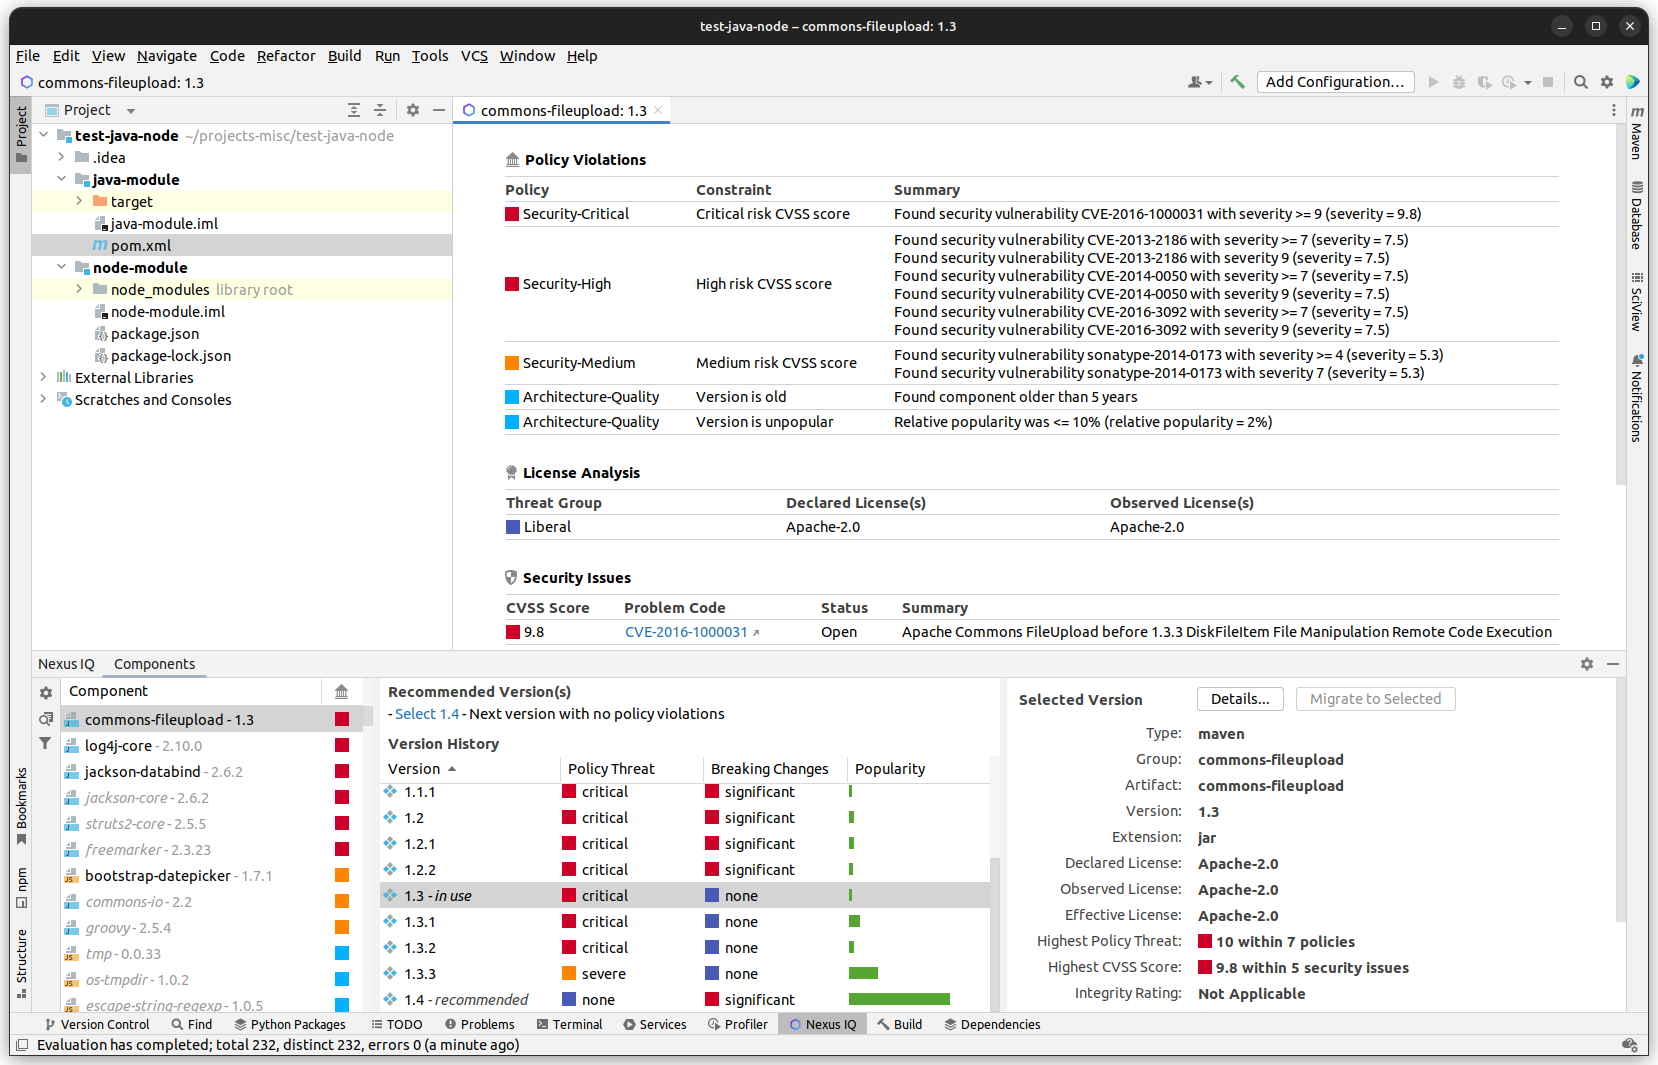
A web application has Node.js frontend and a Maven/Java backend. The project should be organized into at least one Node.js module and at least one Maven/Java module. No module should contain both Java and JavaScript files.
The plugin detects both Java and JavaScript components.
 |
NOTE: IntelliJ IDEA associates one language with a module, even if the module contains files of different languages. The plugin follows this association and detects the components of that language only.
When IntelliJ IDEA has associated Java with a module that contains both Java and JavaScript files, the plugin detects Java components only.
Troubleshooting Load Components
Java Projects
In Maven or Gradle-based projects, when a project is first opened in the IDE, it is possible that it was not imported for the project type (maven or gradle). The symptom for this condition is an empty External Libraries folder in the Project view:
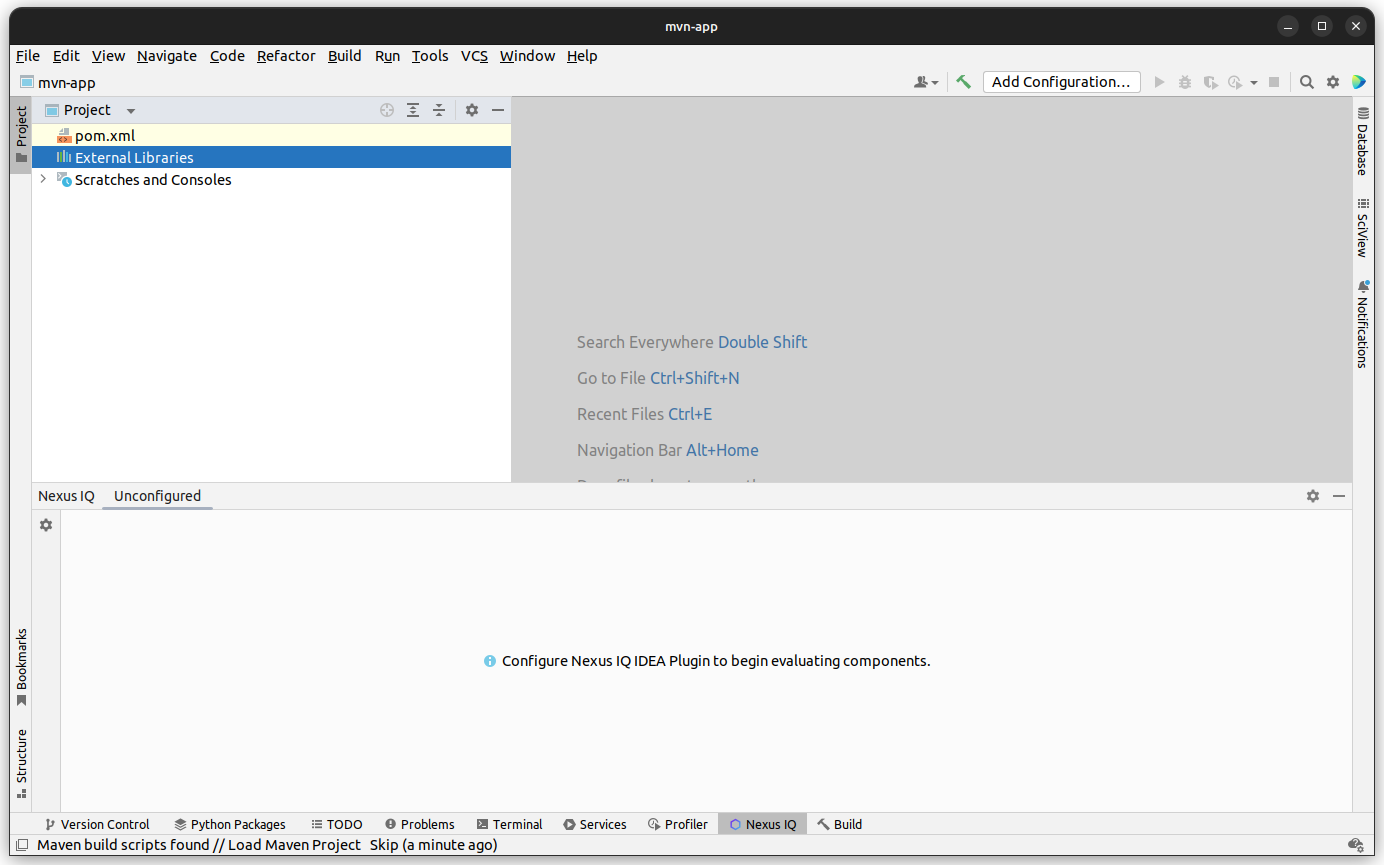 |
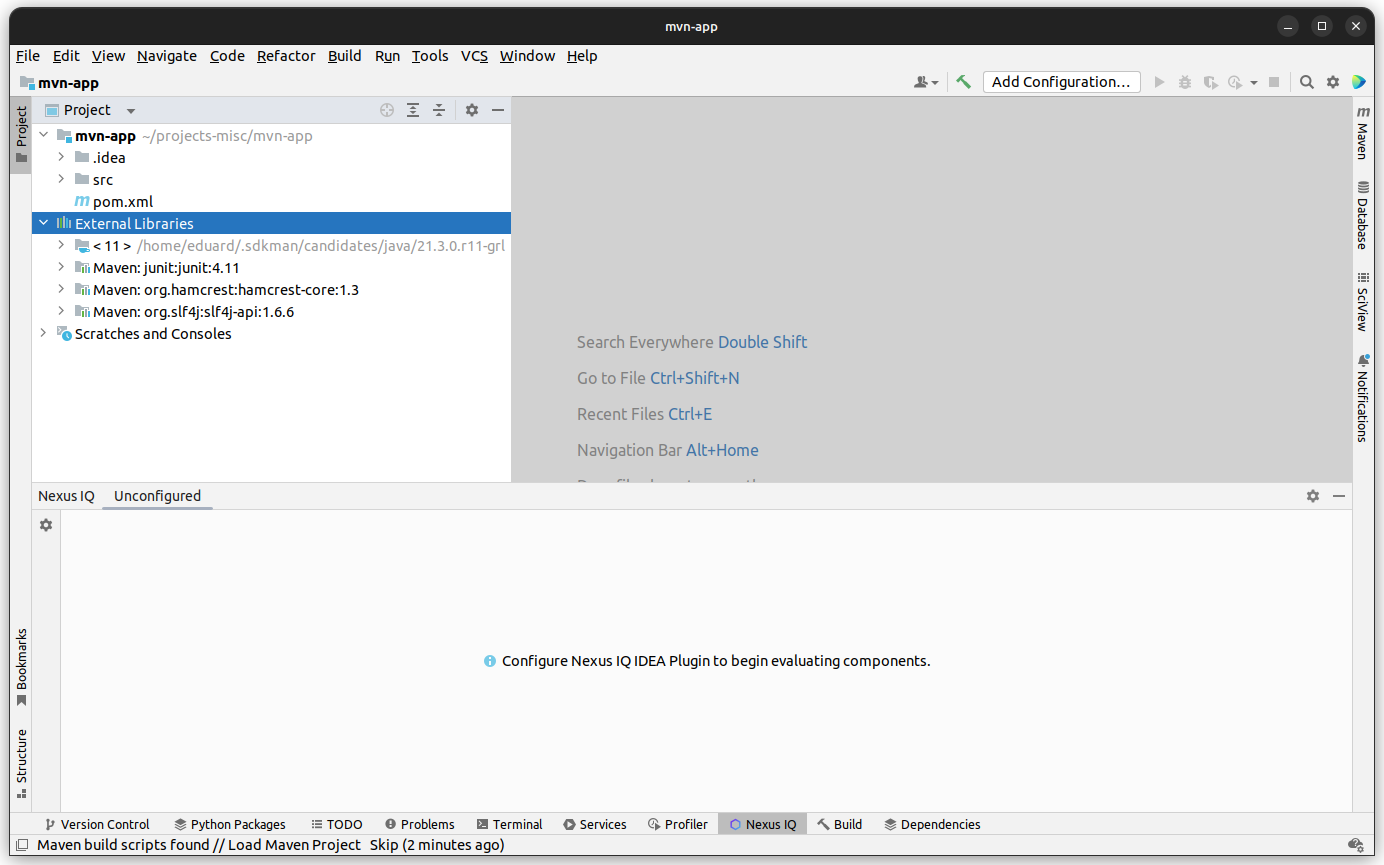
The project (i.e. its manifest files) must be imported to get the list of External Libraries to appear. For Maven projects, locate the root pom.xml file, right-click, then select Maven → Reload project, or Add as Maven Project, depending on your version of IntelliJ IDEA.
NOTE: For Gradle projects locate the build.gradle file, right-click, then select Reload from disk.
This will convert the project to its proper type which will load the External Libraries:
 |
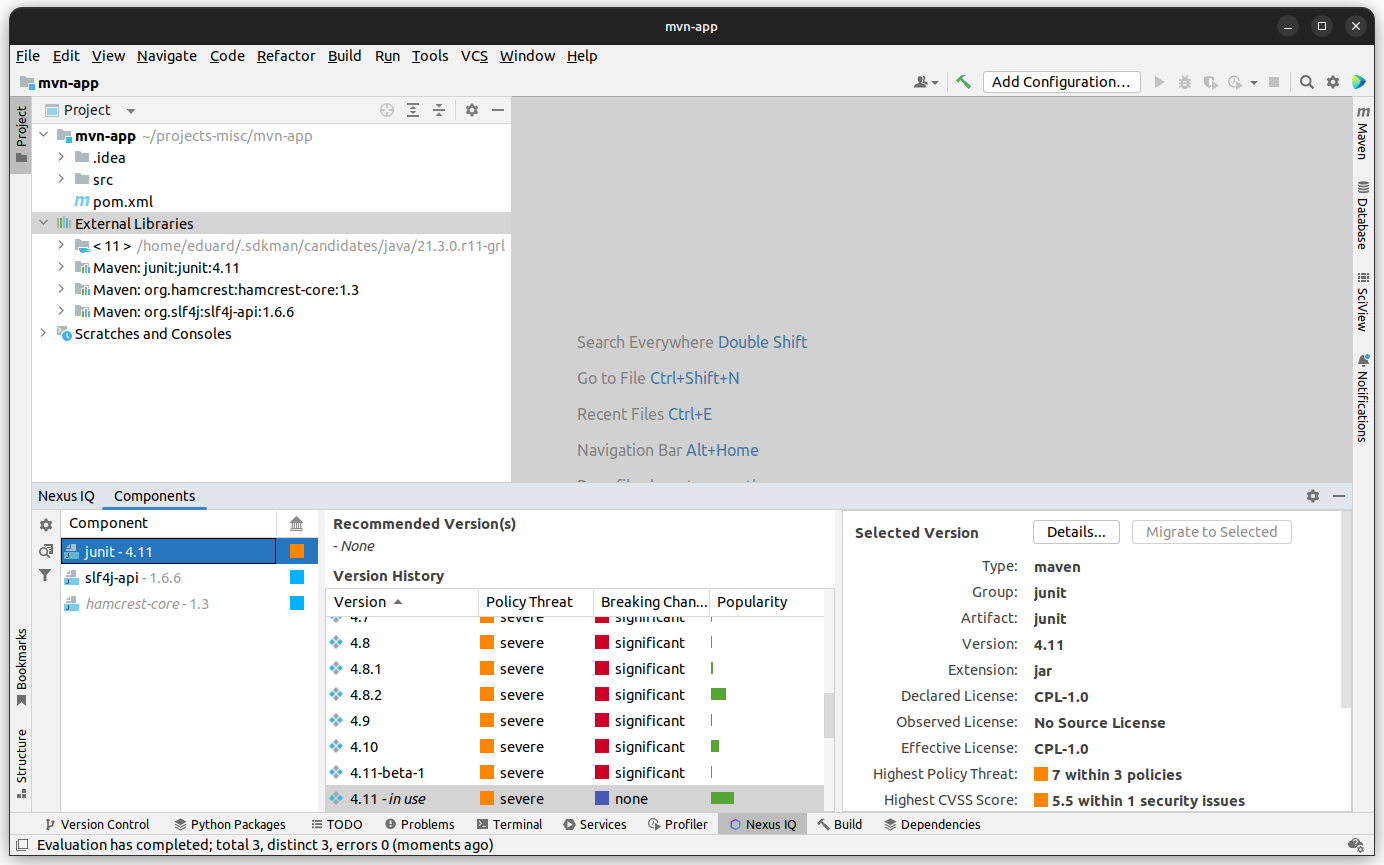
Now, you can click on the Evaluate Components button and the analyzed components will load in the component view. The evaluation results will look something like this:
 |
JavaScript Projects
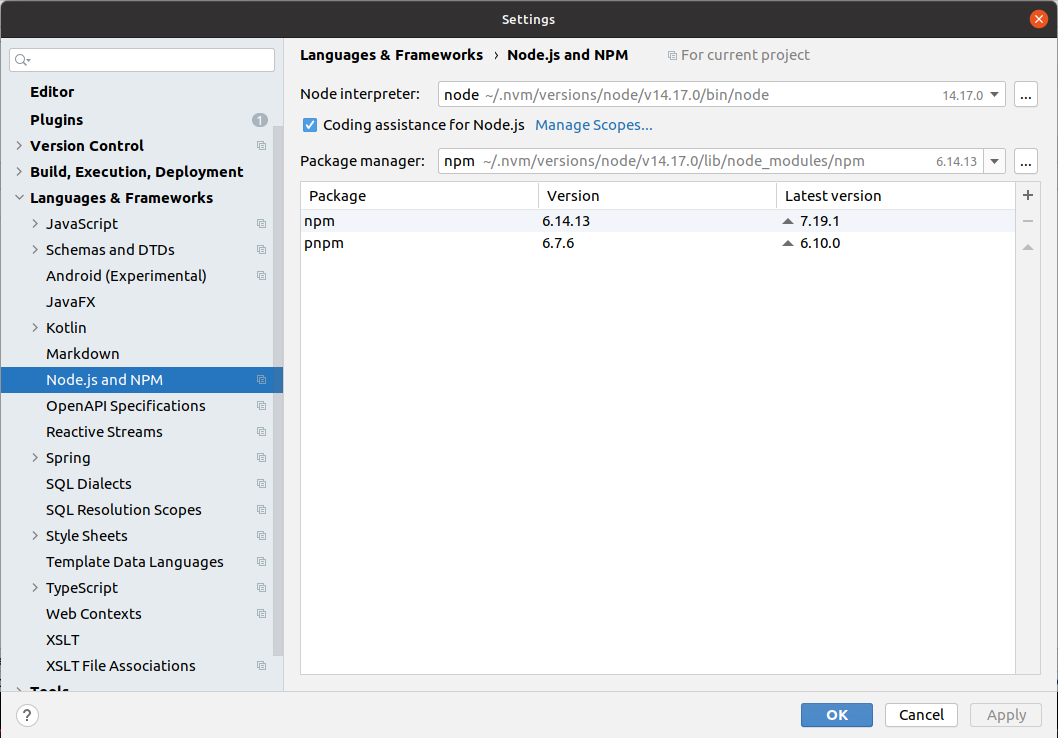
JavaScript projects must be set up in the IDE as Node projects. This can be configured by navigating to File → Settings → Language & Frameworks → Node.js and NPM. The paths to the Node interpreter and the package manager must be valid (see below).
 |
Migrating to Different Component Versions
Note
For Java projects, this feature relies on the project being Maven-based. For JavaScript projects, this feature expects that the project is properly set up in the IDE as a Node project and that a package manager is available (i.e. npm, yarn, or pnpm).
If you determine that a component upgrade is required to avoid a security or license issue or a policy violation, after reviewing your component usage, the plugin can be used to assist you in the necessary refactoring.
The first step to start the migration is to select a newer version for the component in the visualization chart, or by selecting the recommended version.
A version of a dependency with no policy violations and no breaking changes for the same component and its dependencies will be presented as a Golden Version, which means that the migration can be done with minimal effort.
Alternate versions might also be available so you can migrate to them in case there is no Golden Version available.
 |
Once you have selected a different version than the one currently used, the Migrate to Selected button will become active. Selecting the button migrates from the current component version to the selected component version, by updating the component version in the manifest file.
For Maven-based Java projects, the migration process is able to detect circumstances such as the component being a transitive dependency or versions managed in a property. For JavaScript projects, only direct dependencies can be migrated.
After the migration is completed, the component list will be updated and a component scan will be initiated. You should perform a full build, as well as a thorough test, to determine that you can proceed with the new version in your development.
Typically, smaller version changes will have a higher chance of working without any major refactorings, or adaptations, of your codebase and projects, while larger version changes potentially give you more new features or bug fixes.
Your release cycle, customer demands, production issues, and other influencing factors will determine your version upgrade choices. You might decide on a multi-step approach, where you do a small version upgrade immediately to resolve current issues and then work on the larger upgrade subsequently to get the benefits of using a newer version. Or, you might be okay with doing an upgrade to the latest available version straight away. Potentially, a combination of approaches in different branches of your source code management system is used to figure out the best way of going forward with the upgrade.
Code Inspections
New in version 4.3.0, custom code inspections are provided for pom.xml and package.json files. If a component, declared in those files, has critical, severe or moderate policy violations, it gets a code inspection maker attached to it, describing the severity of the violation and providing a link to its corresponding entry in the Component Info view.
 |
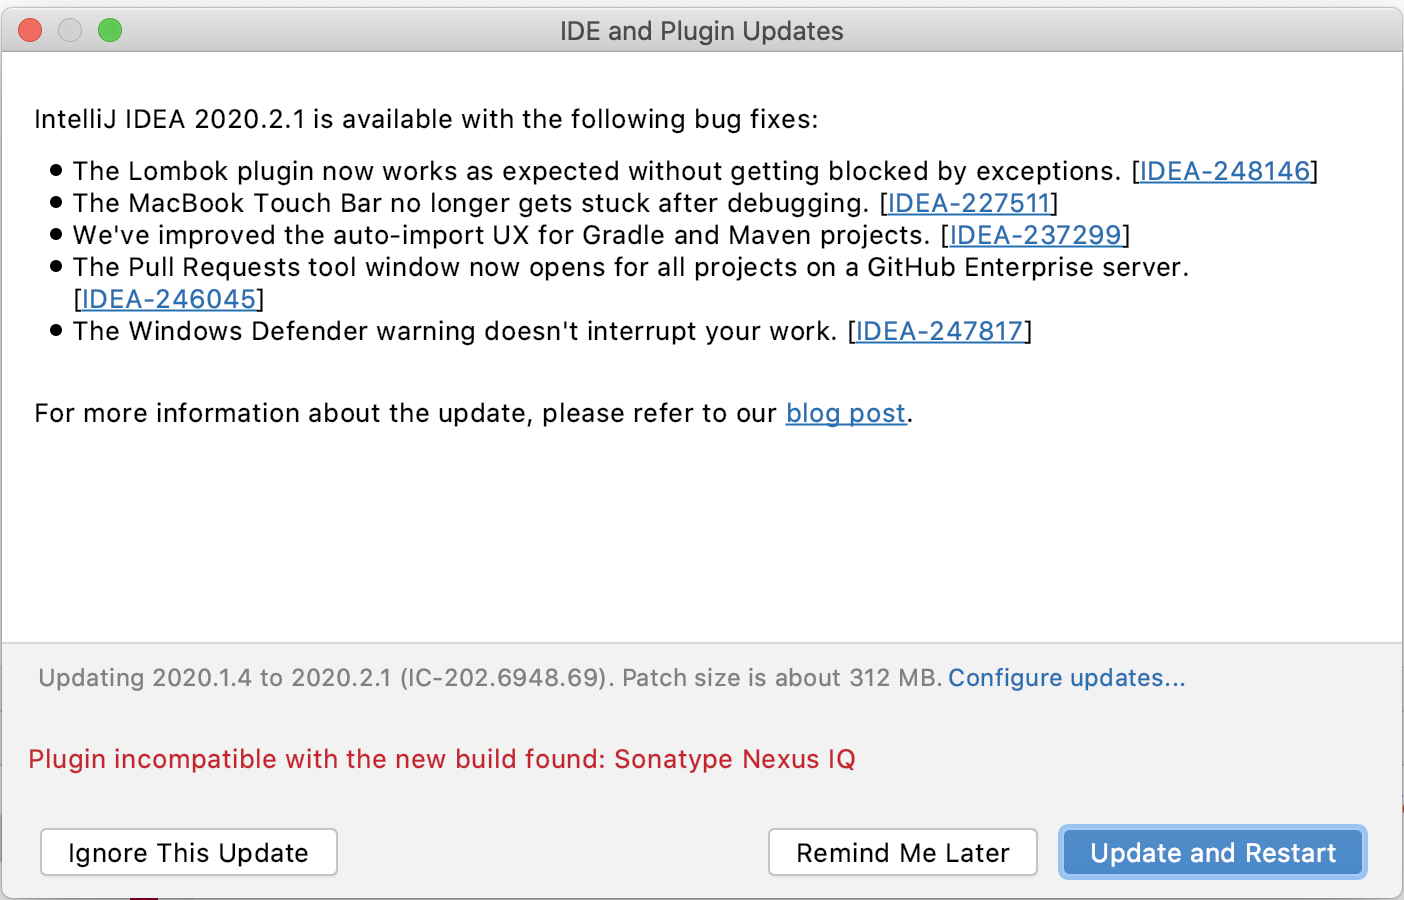
Upgrading to IntelliJ IDEA 2020.2
When upgrading to a newer version of IntelliJ IDEA from version 2020.1.x and below, you will need to install the latest version of the plugin. The Sonatype for IDEA plugin does not automatically upgrade itself when upgrading IntelliJ. We recommend uninstalling the plugin and reinstalling the latest plugin once the upgrade is complete.
You might see a message like this when you start the IntelliJ IDEA 2020.2.x upgrade:
 |