Hosted Repository Scanning and Continuous Monitoring Overview
Hosted Repository Scanning
Hosted Repository Scanning helps you review findings for supported hosted repositories connected from Sonatype Nexus Repository to Sonatype Lifecycle.
Note
Hosted Repository Scanning is audit-only in this release. It reports findings but does not block uploads or downloads.
This topic explains how to configure Hosted Repository Scanning by connecting Nexus Repository to Lifecycle/IQ, generating and using a Lifecycle/IQ user token, configuring global evaluation settings, selecting repositories for monitoring, and applying custom monitoring settings for individual repositories. You can also use the Hosted Repositories dashboard in Lifecycle/IQ to review repository monitoring status and component evaluation reports.
Note
In Lifecycle, Hosted Repository Scanning results are available to users with System Administrator, Policy Administrator, Owner, or Developer roles. Users without one of these roles see an access-denied page.
Before you begin
Before configuring Hosted Repository Scanning, confirm the following:
Your Nexus Repository instance can connect to your Lifecycle instance.
You have credentials for configuring the Lifecycle connection in Nexus Repository.
The Lifecycle account used for the Nexus Repository connection has the Evaluate Individual Components permission at the Repository Managers level.
In Nexus Repository, access to the Hosted Repository Scanning configuration requires the nx-admin or nexus-administrator role.
In Lifecycle, viewing Hosted Repository Scanning results requires the System Administrator, Policy Administrator, Owner, or Developer role.
You have access to configure Hosted Repository Scanning settings in Lifecycle.
At least one hosted repository uses a supported repository format.
Self-hosted deployment considerations
For self-hosted deployments, review the reference architectures for both Nexus Repository and Lifecycle/IQ when planning capacity for Hosted Repository Scanning.
For deployment sizing information, see Sonatype Reference Architectures
Supported repository formats
Hosted Repository Scanning supports the following hosted repository formats in this release:
Supported format |
|---|
Maven |
NuGet |
npm |
PyPI |
Helm |
Conda |
Go |
RubyGems |
R |
Pub |
Connect Nexus Repository to Lifecycle/IQ
To use Hosted Repository Scanning, connect your Nexus Repository instance to Lifecycle/IQ.
Note
Access to the Hosted Repository Scanning configuration UI in Nexus Repository is restricted to the nx-admin or nexus-administrator role. Users without either role do not see or access the configuration entry point.
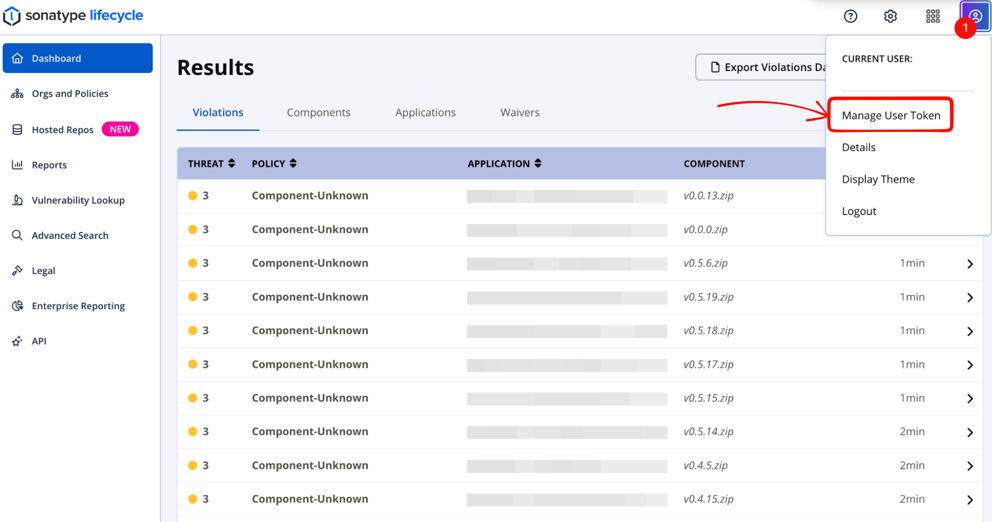
Generate a user token in Lifecycle/IQ
In Lifecycle, open the user menu.
Select Manage User Token.
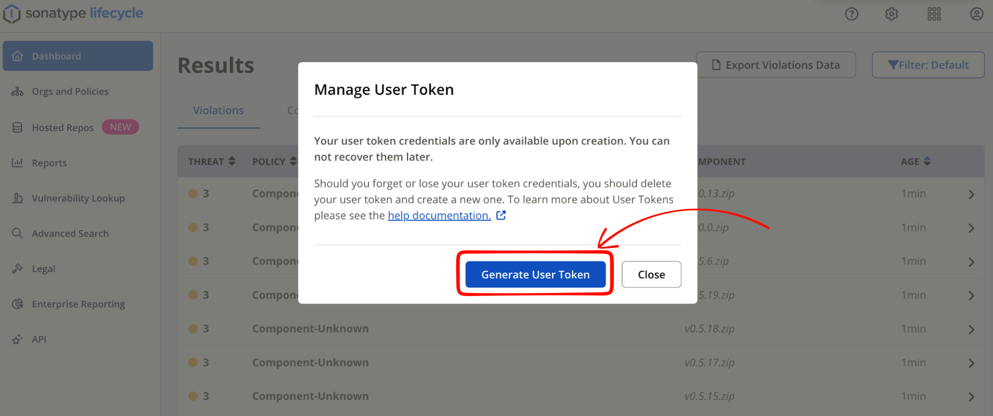
In the User Token dialog, copy the generated username and password.
Configure the Lifecycle/IQ connection in Nexus Repository
In Nexus Repository, go to Settings \> IQ Server.
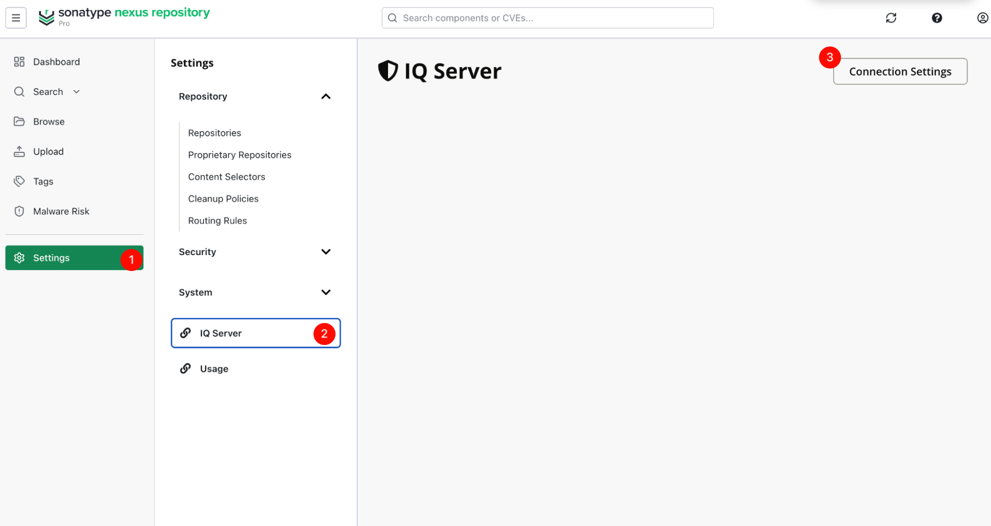
Select Connection Settings.
In IQ Server URL, enter the Lifecycle/IQ server URL.
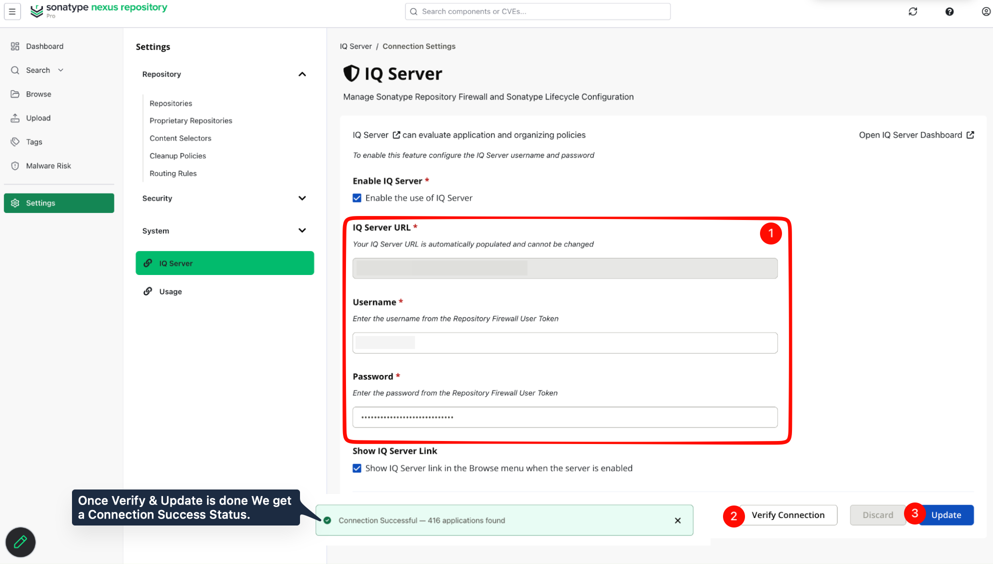
Enter the username and password from the Lifecycle/IQ user token.
Select Show Link if you want the Lifecycle/IQ link to appear in Nexus Repository.
Click Verify connection.
After the connection is verified, click Update.
After the connection is saved, Nexus Repository shows the connected Lifecycle/IQ server URL on the IQ Server configuration page.
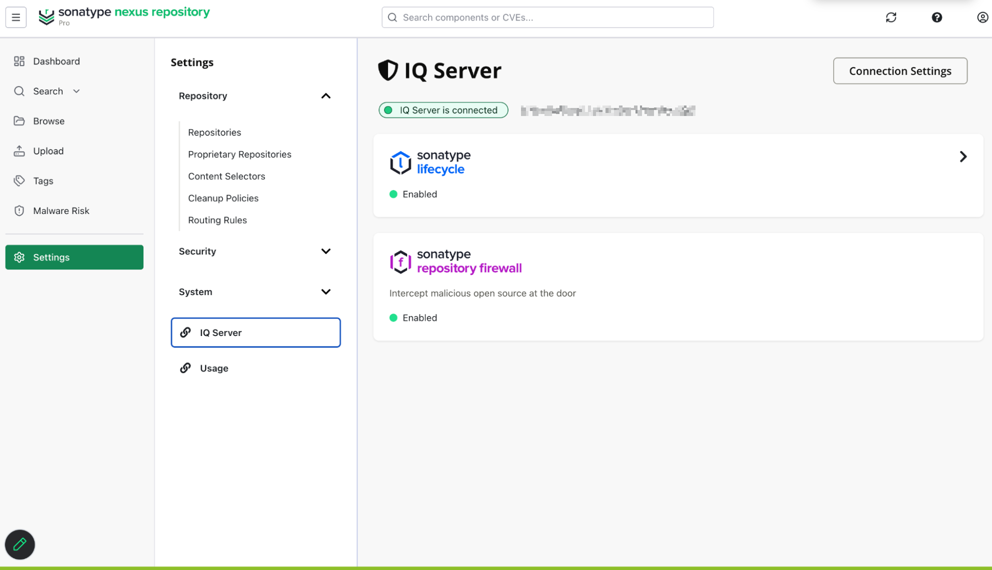
Note
Disconnecting or changing the Lifecycle/IQ connection from Nexus Repository updates the Nexus Repository side of the connection. The repository manager record may still appear in Lifecycle/IQ.
Verify the connection
After saving the connection, verify that the Nexus Repository instance appears as connected in Lifecycle/IQ.
In Lifecycle/IQ, open Hosted Repos.
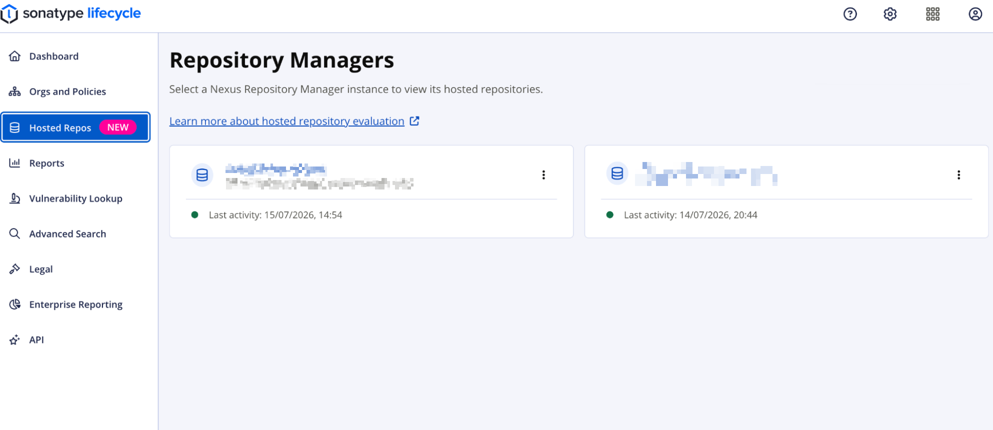
Confirm that the connected Nexus Repository instance appears in the repository manager list.
Confirm that the repository manager card shows recent activity.
Configure hosted repository monitoring
After Nexus Repository is connected to Lifecycle/IQ, configure hosted repository monitoring in Lifecycle/IQ.
In Lifecycle/IQ, open the hosted repository scanning page for the connected repository manager.
Review the dashboard overview.
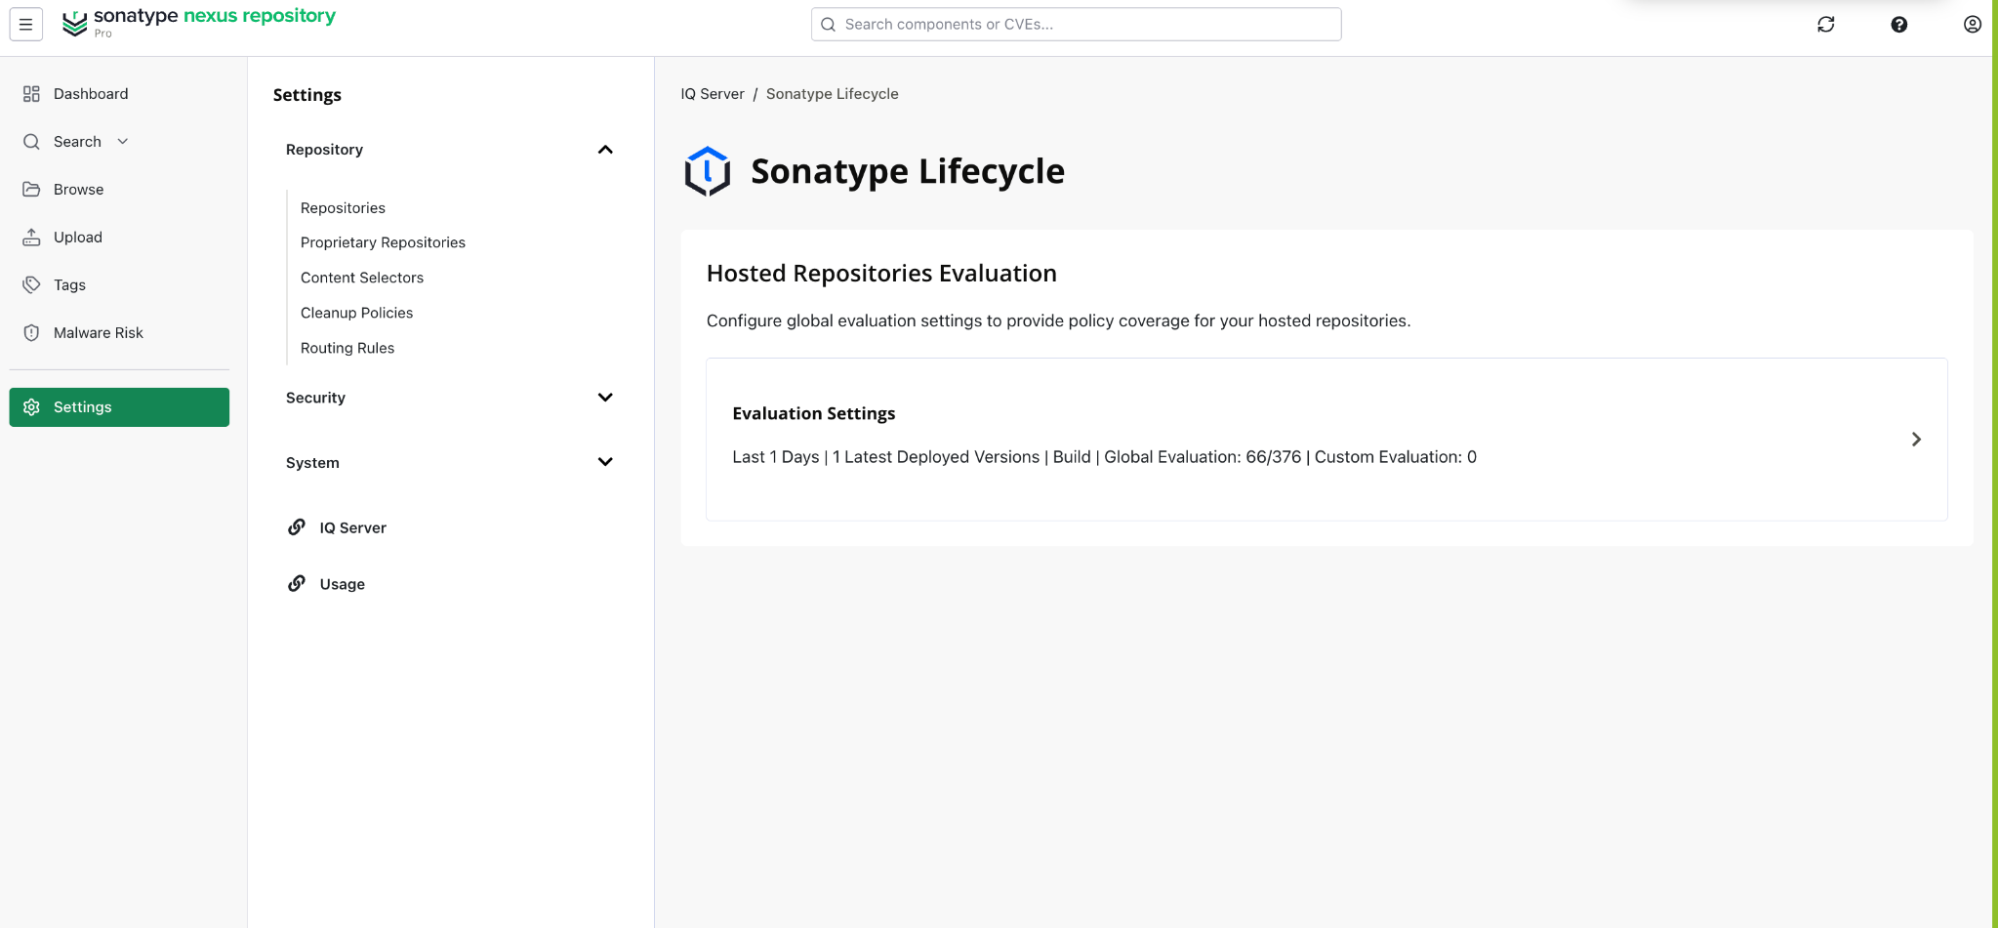
Configure the global monitoring settings.
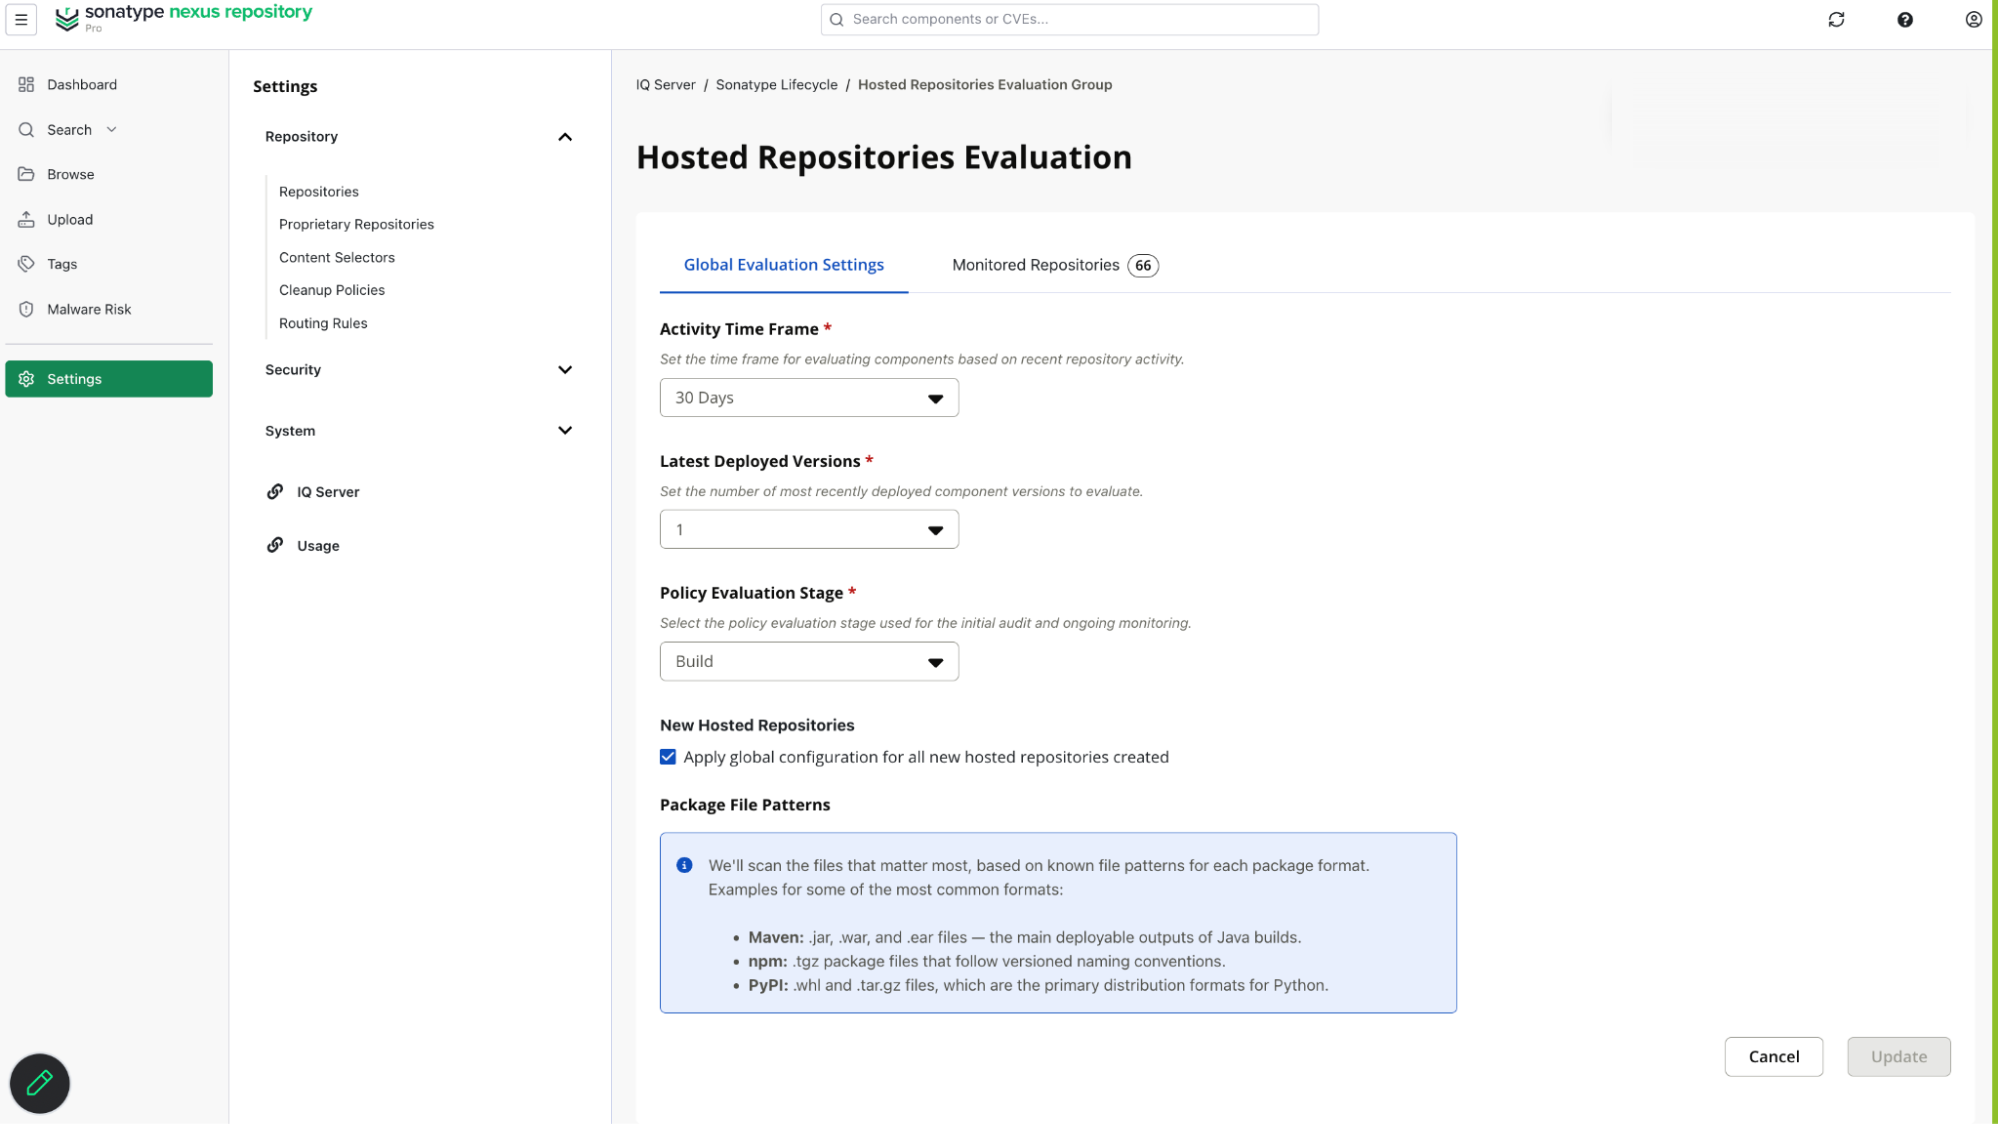
Note
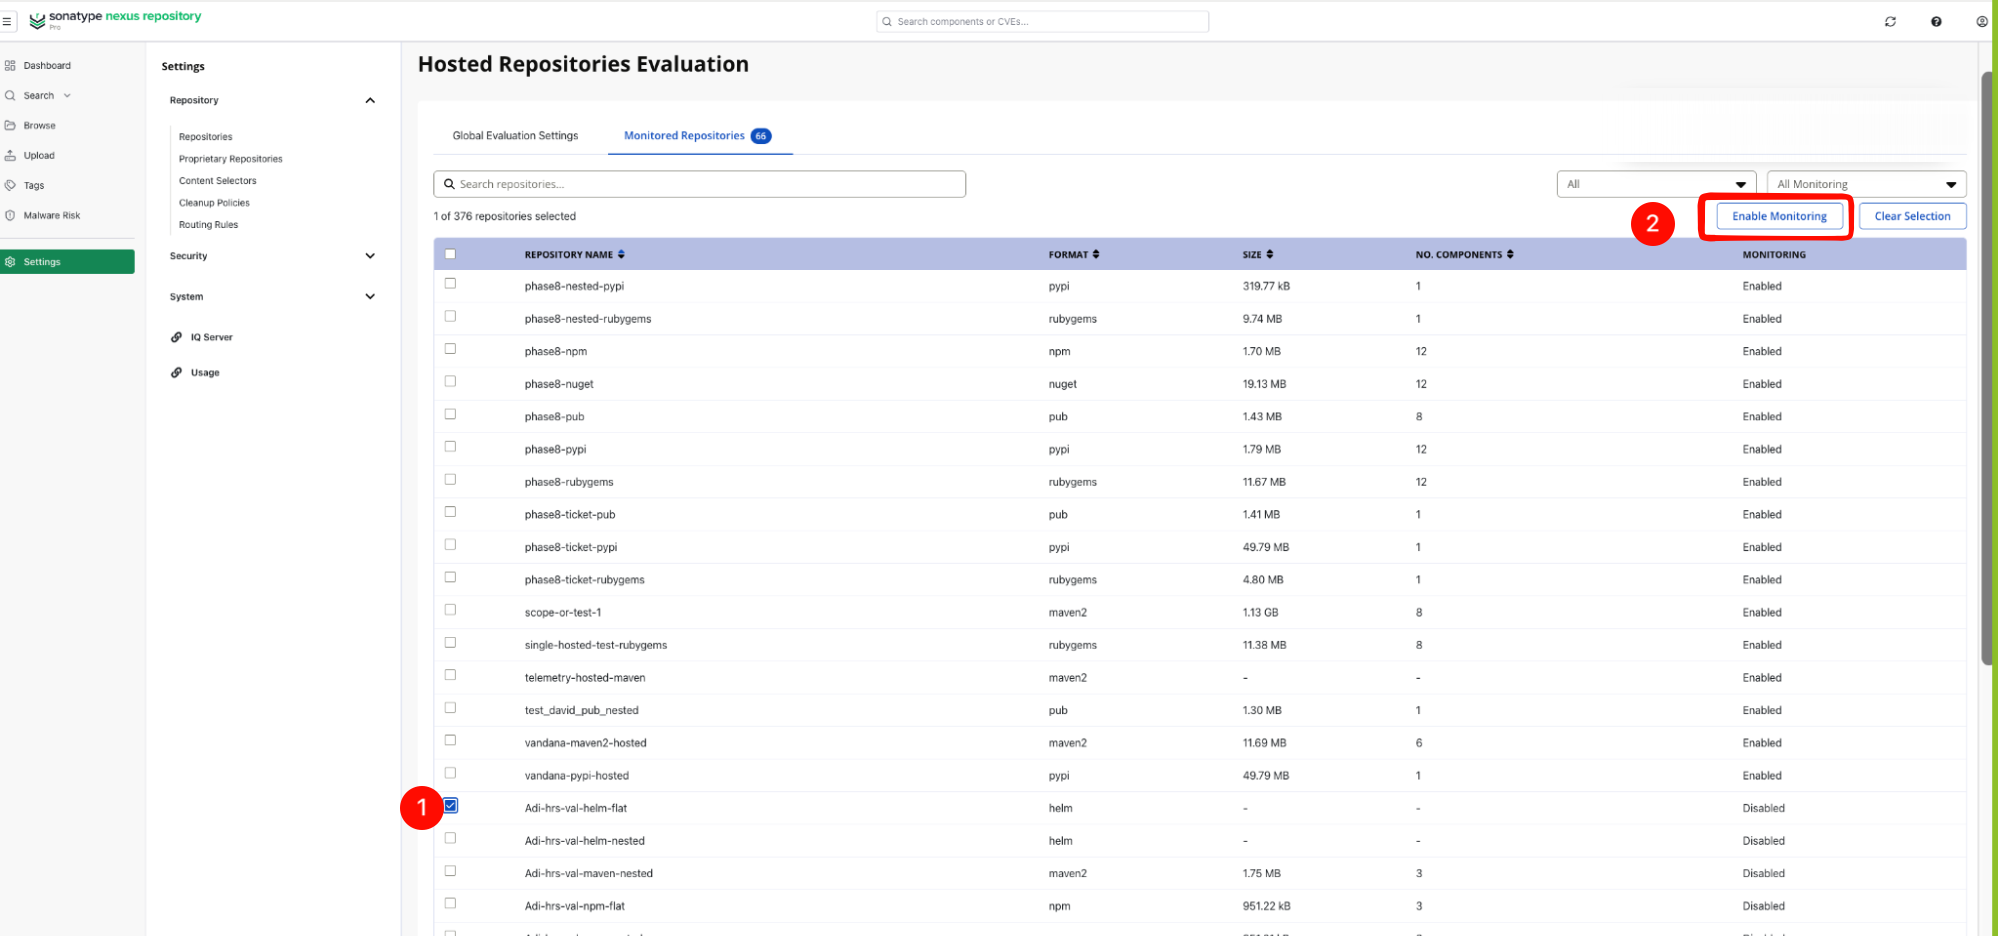
Activity Time FrameandLatest Deployed Versionsuse OR logic. A component version is monitored if it has activity within the selected time frame or is among the configured latest versions. For example, with 30 days and 5 versions, all versions active within 30 days are included, while the five latest versions of less frequently updated components remain in scope, even if older than 30 days.Select the hosted repositories that you want to monitor, click Enable Monitoring, and then click Update.
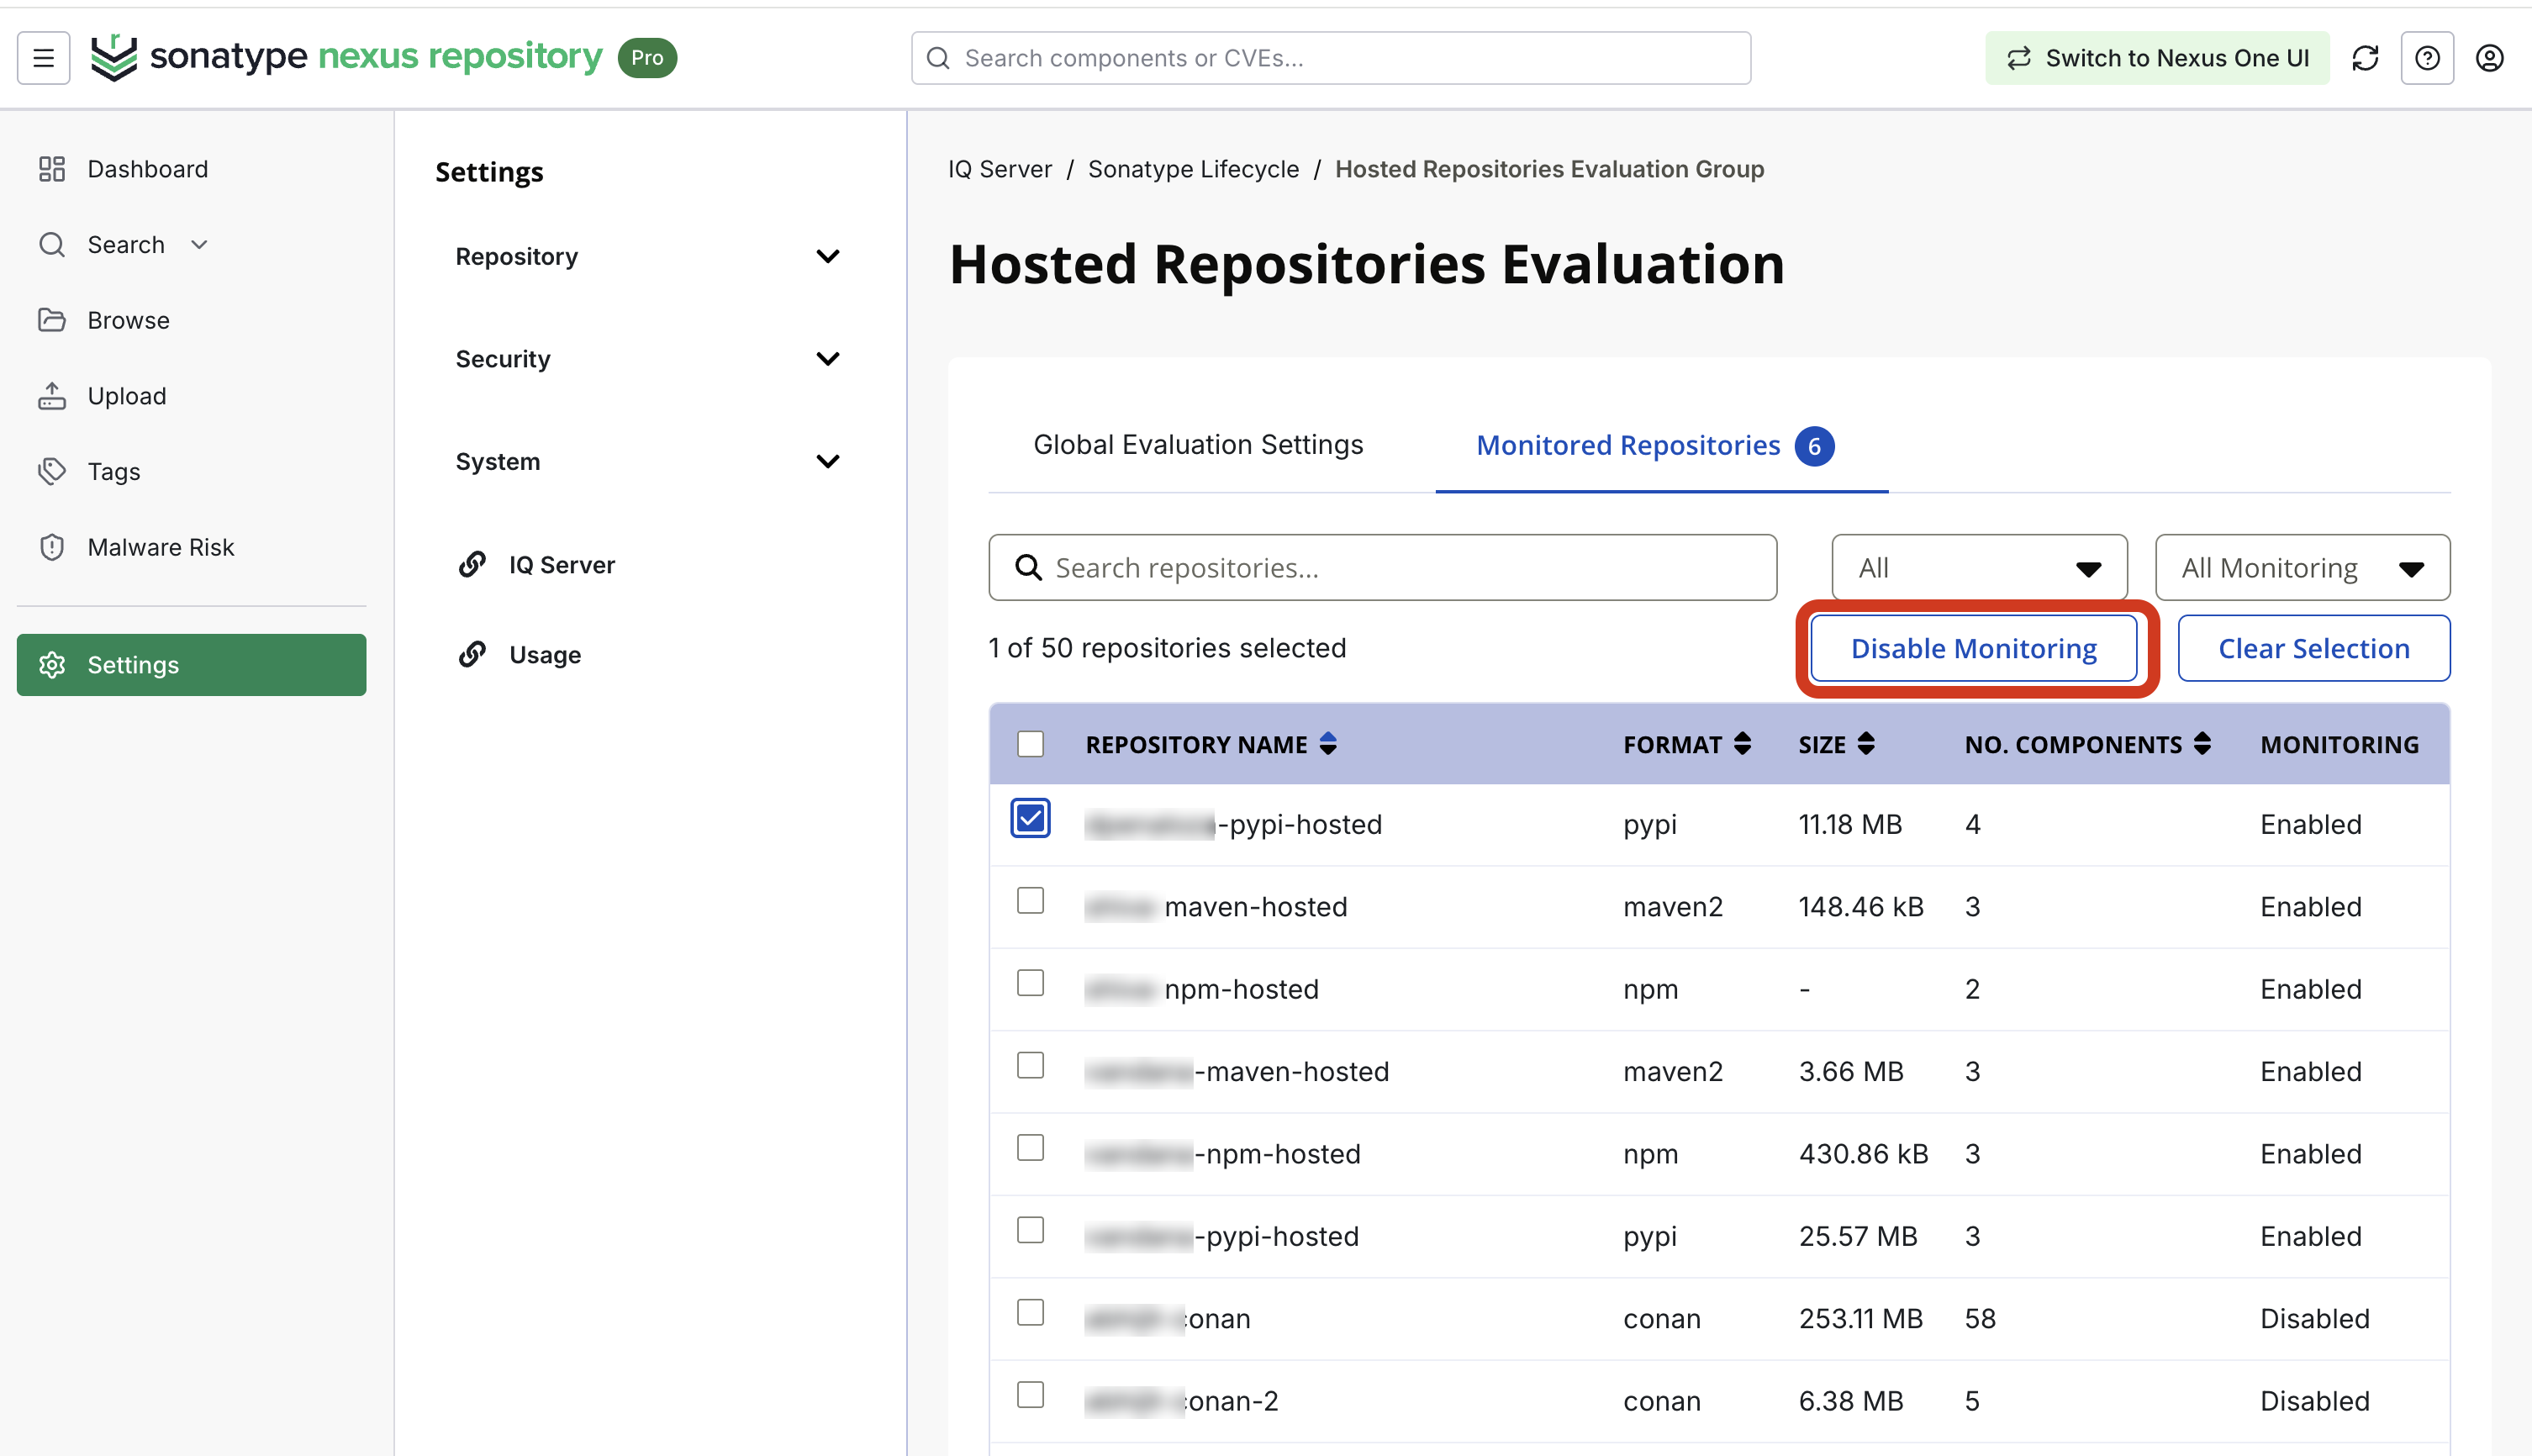
To stop monitoring a repository, clear the repository selection, click Disable Monitoring, and then click Update.
The dashboard overview is available after you configure the monitoring settings and click Update
Configure scanning scope
Hosted Repository Scanning can limit which repository components are included in scans and continuous monitoring.
Note
Configure scan scope before running the first scan. Scanning all repository contents can increase onboarding time and resource usage for large repositories.
Use the available monitoring settings to define the scan scope for hosted repositories. Scope settings may include activity time frame, version depth, repository format, and evaluation stage, depending on the configuration available in your Lifecycle/IQ version.
From the current workflow, the hosted repository monitoring configuration includes the following settings:
Setting | Description |
|---|---|
Activity time frame | Defines the time frame used to determine whether a component is active, based on upload or download activity. |
Latest deployed versions | Defines the number of latest deployed versions included in monitoring scope. For example, if a component has three versions uploaded at different times: |
Evaluation stage | Defines the Lifecycle policy evaluation stage against which you want the hosted repository components to be evaluated |
Apply global configuration for all new hosted repositories created | When this option is selected, monitoring will be automatically enabled for every newly created hosted repository. Each new hosted repository will inherit and use the global evaluation settings that were previously configured. |
Select repositories for monitoring
Use the hosted repositories list to select which repositories are included in Hosted Repository Scanning.
In the hosted repository scanning page, review the list of hosted repositories.
Select the repositories that you want to monitor, click Enable Monitoring, and then click Update.
After you click Update, enabled repositories are queued for scanning. If the queue is empty, scanning can begin immediately.
Note
The scan queue is not visible on this page.
Configure custom monitoring for a repository
You can configure custom monitoring settings for an individual hosted repository.
In Nexus Repository, open Settings.
Go to Repository \> Repositories.
Select the hosted repository that you want to configure.
In Hosted Repository Evaluation, select override the global configuration.
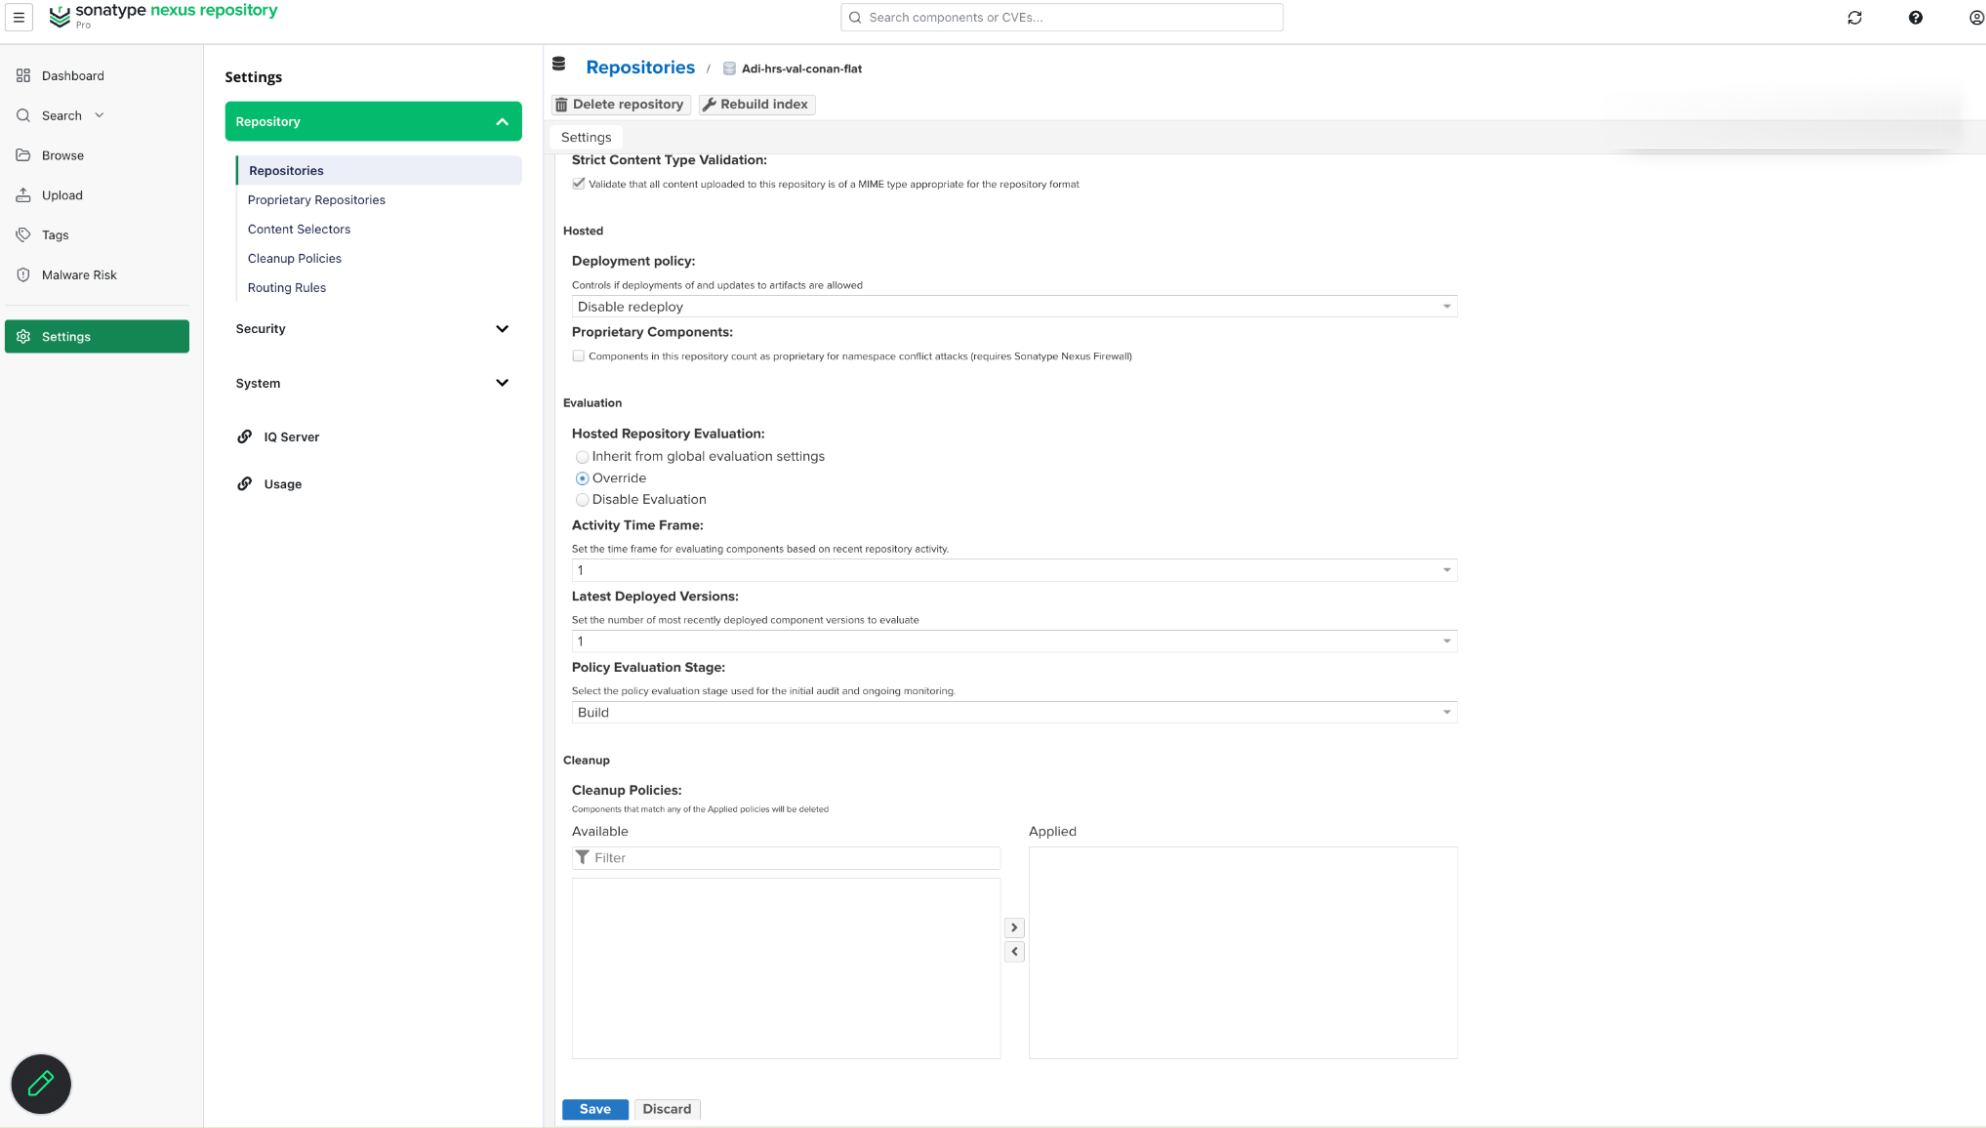
Configure the custom monitoring settings.
Click Save.
After saving custom monitoring settings, Lifecycle/IQ displays a confirmation message.
When you return to the hosted repositories list, the repository shows a custom monitoring label.
Run the first scan
The first scan evaluates the selected hosted repository contents based on the configured scan scope.
When a repository is enabled for Hosted Repository Scanning and the configuration is updated, the repository will be queued for scanning immediately upon update, using the newly updated configuration settings.
The first scan is complete when the repository scan reaches the completed state in Lifecycle/IQ and findings are available for review.
Continuous monitoring
After the first scan, continuous monitoring provides ongoing evaluation for hosted repositories.
Continuous monitoring reviews in-scope hosted repository components for updated findings based on the configured monitoring scope.
Hosted repository Continuous Monitoring is scheduled once daily. By default, the job that queues monitoring evaluations is scheduled between 12:05 AM and 12:15 AM UTC. This window is based on the configured policy monitoring hour (12:00 AM UTC by default), plus 10 minutes and a random offset of up to five minutes. Component evaluations are processed asynchronously after being queued.
Note
Hosted repository Continuous Monitoring (CM) is separate from application-level CM. It monitors components in hosted repositories rather than applications and uses different scheduling and thread configurations. The application CM guide and its -Dinsight.threads.monitor setting do not apply to hosted repository CM.
Continuous Monitoring thread configuration
For self-hosted Lifecycle deployments, the continuousMonitoringWorkerThreads configuration property controls the number of hosted repository monitoring evaluations that can run concurrently. The default value is 4, and supported values range from 1 to 64.
Increasing the value can increase concurrent evaluation activity and resource usage.
Use the Configuration REST API to configure this property.
View hosted repository results in Lifecycle
After hosted repository scanning runs, you can review hosted repository results in Lifecycle.
In Lifecycle, open Hosted Repos.
On the Repository Managers page, select the repository manager that contains the hosted repository.
Select the hosted repository that you want to review.
Review the Latest Component Evaluation information.
Select Report to view the report for a repository component.
Select Priorities to view priority information for a repository component.
Automation
You can use the Hosted Repository Scanning REST APIs to access scanned component data and reports programmatically, export SBOMs, and retrieve remediation recommendations.
Note
For endpoint details, parameters, permissions, and examples, see Hosted Repository Scanning REST APIs.
Troubleshooting Hosted Repository Scanning
Use the following table to troubleshoot common Hosted Repository Scanning setup, scan, and monitoring issues.
Issue | What to check | Where to look |
|---|---|---|
Nexus Repository cannot connect to Lifecycle/IQ | Confirm the Lifecycle/IQ URL, user token credentials, network route, proxy settings, and TLS configuration. | Nexus Repository IQ Server settings and Nexus Repository logs |
Lifecycle/IQ is unreachable or slow to respond | Confirm Lifecycle/IQ availability and recent restart or service issues. | Lifecycle/IQ status pages, Lifecycle/IQ logs, and repository manager connection status |
Credentials are rejected | Confirm that the configured user token credentials are valid and have not been reset. | Lifecycle/IQ User Token dialog and Nexus Repository IQ Server settings |
Connection status does not update | Confirm recent activity from the Nexus Repository instance and check for network interruptions. | Lifecycle/IQ repository manager status and Nexus Repository logs |
Hosted repository dashboard is not visible | Confirm that monitoring details were configured and saved by clicking Update. | Hosted repository scanning page in Lifecycle/IQ |
Repository is not available for scanning | Confirm the repository is hosted and uses a supported format. | Supported repository formats table |
Components are missing from scan or monitoring results | Check the configured scan scope, including activity time frame and latest deployed versions if available. | Hosted repository evaluation settings |