Manual Upgrade Methods
When upgrading a Nexus Repository instance or consolidating to an existing instance, you can manually upgrade repository content into Nexus Repository using any of the following methods:
Using the Repository Export/Import features
Including external proxies in a group repository
Running scripts using the REST API
Manual upgrade methods have a few considerations:
Expect to spend a fair amount of time in planning and executing any upgrade
You cannot import or export repository configuration
Some data duplication is required
Prerequisites
Before proceeding with any upgrade, we recommend taking the following steps:
Prerequisite | Required/Recommended | Details |
|---|---|---|
Access to Repository Storage | Required |
|
Ensure your Nexus Repository 3 instance is using an external PostgreSQL database | Recommended | We highly recommend that you set up your Nexus Repository 3 instance with an external PostgreSQL database. See configuring an external PostgreSQL database or migrating an existing Nexus Repository 3 instance to a PostgreSQL database. |
Back Up Infrastructure | Recommended | |
Do a Test Run | Recommended |
|
Use Import Hard Links | Recommended |
|
Avoid Importing Directly to S3 | Recommended |
|
Firewall Repositories | Optional |
|
Export/Import Manual Upgrade Method
Using Repository Export and Repository Import is the easiest and fastest manual method to copy a repository's contents from one Nexus Repository instance to another.
Considerations
You can directly import Nexus Repository 2 repository content from where it is stored on disk.
The import task will maintain the created date, last updated date, and the last downloaded date attributes from Nexus Repository 2.
In cases where the content in the source directory changes or the process is interrupted, you can use these tasks to only add the missing/additional content.
The tasks must be manually created; you cannot use scripts or the API.
You will need to create and run individual tasks for each repository.
Multiple tasks will not run at the same time.
Steps for Nexus Repository 2 to 3 Export/Import Upgrade
Ensure that your Nexus Repository 3 instance has file system access to the Nexus Repository 2 storage; consider using a backup if Nexus Repository 2 is located on a different server.
On your Nexus Repository 3 instance, create the target repository to which the content will be imported.
Note
As a best practice, ensure that the blobstore for the target repository is on the same storage as the source repository; this will allow you to use hard linking (recommended).
Under Administration → System → Tasks on the Nexus Repository 3 instance, create a new Repository - Import external files task.
Set the source directory to the folder where the Nexus Repository 2 repository is stored.
Optionally, select Enable Hard Links (Recommended).
Run the task.
For testing, you may stop the task before it is completed.
Review the importing documentation on how to reset the import process.
When finished use the Move Blob Store steps to use a different storage disk or S3 object store
Note
If you have a lot of data to copy into the repository, this upgrade may take some time. Consider using the Proxying Repositories method below to make the source content available while waiting for the import tasks to complete.
Proxying Repositories Manual Upgrade Method
One common use case for proxy repositories is to use them to make content immediately available on a new Nexus Repository instance while slowly moving content as it is requested.
Considerations
This upgrade will only copy content that is actively being requested by development and production. This may be an effective way to avoid moving unused content.
Nexus Repository fetches imported components through the proxy over HTTP(S), which can be very slow.
You will need to maintain both repository instances until your new instance contains all needed content.
You cannot convert a proxy repository to a hosted repository when the process is complete.
Steps for the Proxying Repositories Manual Upgrade Method
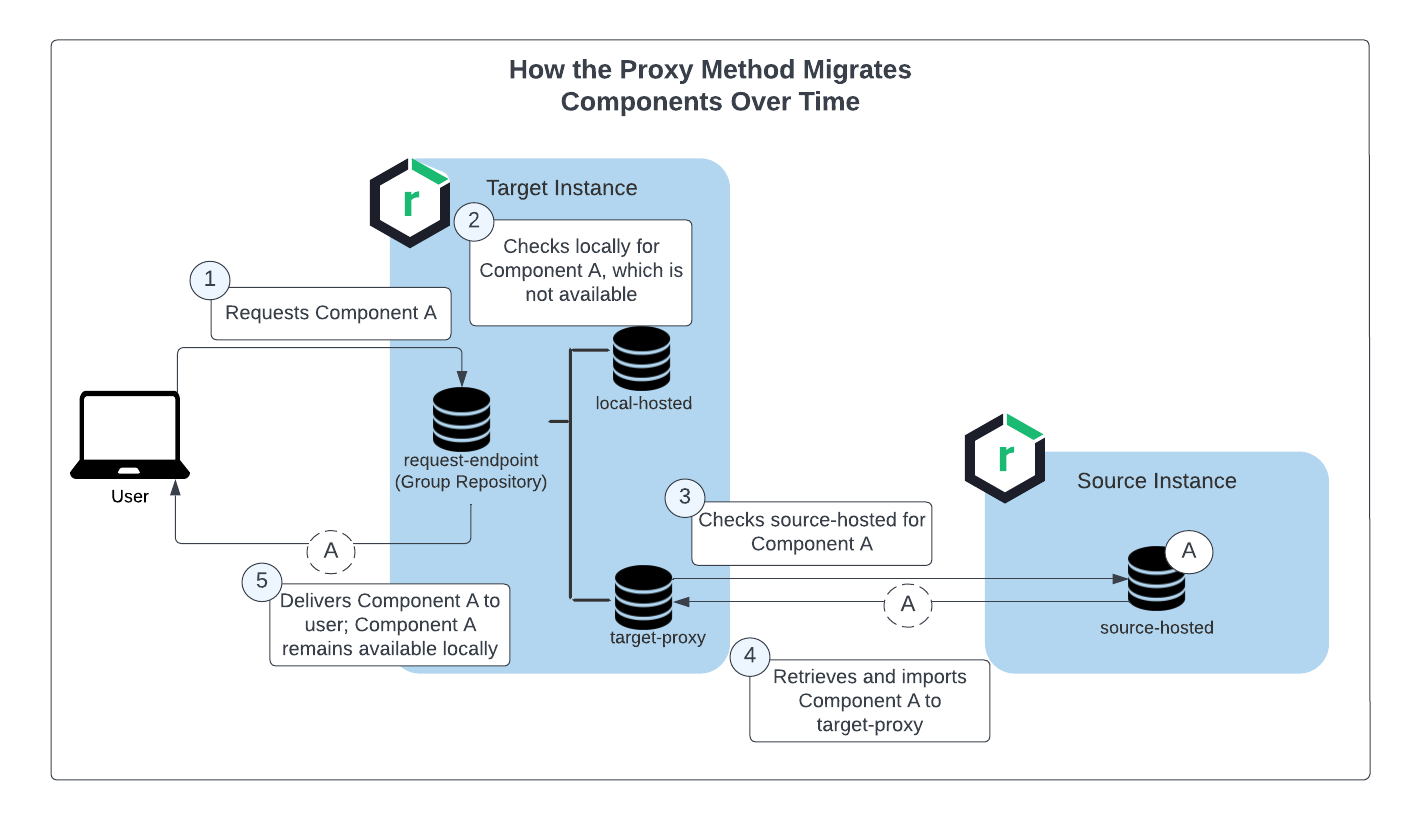
This method involves creating a proxy repository (called target-proxy in the example below) on the new Nexus Repository 3 instance and having that proxy repository use the URL of hosted repository on a source instance (called source-hosted in the example below).
When a component is requested from but not found on the target repository group (called request-endpoint in the example below), Nexus Repository downloads the component from the hosted repository on the source instance through the proxy repository. This is demonstrated in the diagram below:
 |
This configuration can be used until the upgrade is complete.